How to Make a Zip File on Mac and Windows
 4.1K
4.1K
 0
0

Have you ever wondered how to make a zip file? I guess you have. When you try to send lots of files through email, you might not want to send each one separately. That’s why you need to create a zip file. Another reason to make a zip file is to have a single place to place all of your important files. So in this article, I will show you how to make a zip file on Mac and Windows computer.
How to make a zip file on Mac
Method 1. Make a zip file on Mac using Archive Utility
Mac has a built-in archiving utility that can make a zip file or unzip files. You can simply double-click a zipped file to expand it, or select multiple files and compress them from the Finder. Please follow below guide to make a zip file on Mac by using Archive Utility.
1. Highlight the items you want to zip in the Mac Finder.
2. Right-click on the file, folder, or files.
3. Select “Compress * Items” and wait your Mac Archive Utility to compress them.
4. Find the newly created .zip archive in the same directory.

Mac’s Archive Utility is pretty basic. It only can handle a few file formats for expansion, and three popular file formats for compression. That’s why so many third-party apps are also available.
Method 2. Make a zip file on Mac using Better Unarchiver
Better Unarchiver is an third-party app developed by Cisdem that can expand many different kinds of archive files including RAR, Zip, 7-zip, ISO, Udf, Wim, TAR, CHM, etc. files and compress files to 7z, Tar, Zip on Mac.
This app allows you to preview archive contents without decompressing and entirely or partially decompress archive files. Download it for free trial now and follow the guide below to make a zip file on Mac.
1. Install Better Unarchiver and open it on Mac.
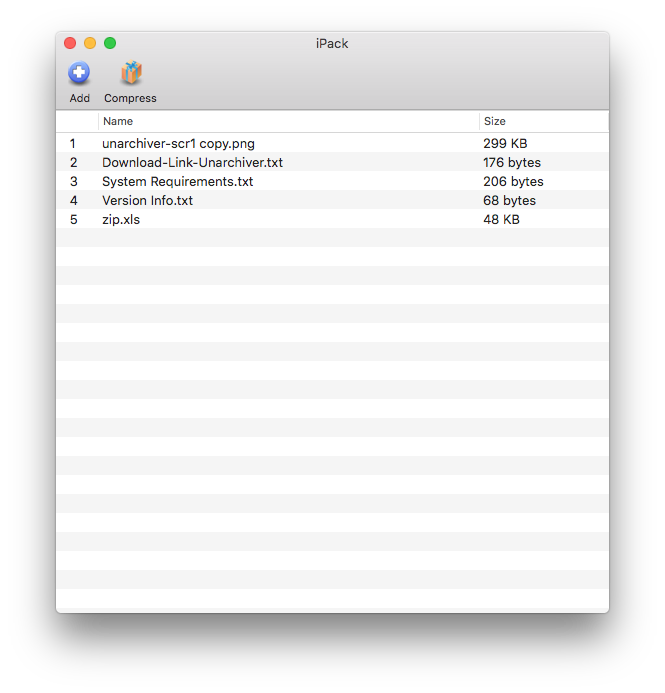
2. Click “iPack” and a window will appear. Then click “Add” button to add files you want to zip. You can also drag and drop files to it.

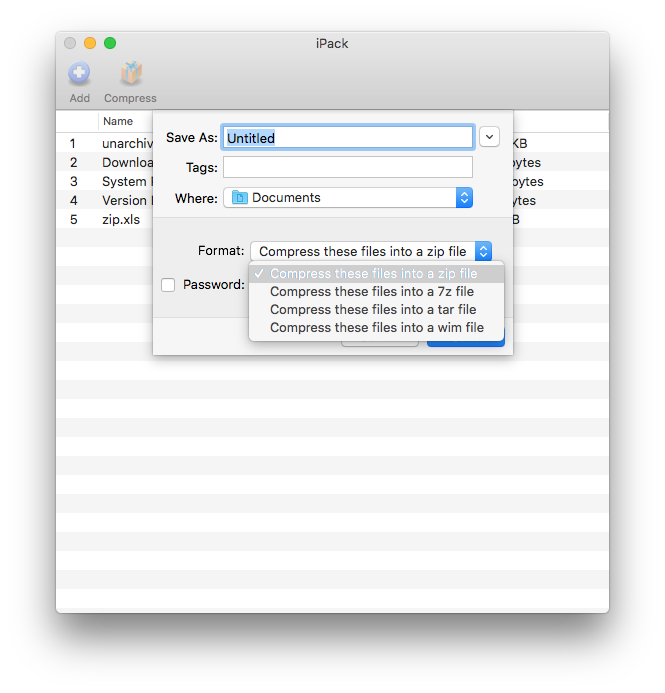
3. After you add files, click “Compress” and choose output format such as zip, tar, 7z file. Here you can choose “Compress these files into a zip file” and then click “Save” to save zip file on your Mac.

By the way, Better Unarchiver also allows you to open zip files quickly. You can follow this guide to do that: How to Open Zip Files on Mac?
How to make a zip file on Windows
Just like Mac, Windows also has a built-in tool for zipping a batch of files. Below is on Windows.
1. Locate the file or folder that you want to zip.
2. Press and hold (or right-click) the file or folder, select “Send to”, and then select “Compressed (zipped) folder”.
3. A new zipped folder with the same name is created in the same location. You can rename the zip file by right clicking it, selecting “Rename” and typing a new name.

tips:
To add files or folders to a zipped folder you created earlier, drag them to the zipped folder.
Don’t add encrypted files to a zipped folder to avoid unintentional disclosure of personal or sensitive information.
Some types of files, like JPEG images, are already highly compressed. If you compress them into a zipped folder, the folder size may not change.
As you see, creating a zip file is just a piece of cake whether on Mac or on Windows. If you have any other tips about how to make a zip file, leave comments to share them.

Rosa has worked in Mac software industry for more than eight years. She believes that the purpose of software is to make life better and work more productively. In addition to writing, Rosa is also an avid runner.


 Free Download