
How to Recover Permanently Deleted Photos on Mac (Also from Photos App)
 24.9K
24.9K
 2
2


Ever deleted photos from Recently Deleted folder in Photos app or emptied the Trash bin on your Mac, only to find you’ve deleted them by mistake? We’ve all been there, and start thinking about how to recover permanently deleted photos on a MacBook (Air, Pro), iMac, Mac.
The good news is that restoring permanently deleted photos on Mac requires minimal effort and time. The most important part is to consider the tool you should use. Actually, deleted photos on a Mac can be even rescued with free solutions.
TL;DR — Quick Highlights
- Permanently deleted photos can be recovered as long as they are not overwritten by the data newly added to your Mac. So, you should stop writing to your Mac as soon as possible since the deletion.
- There are free ways to recover permanently deleted photos on Mac, via Time Machine backup, iCloud backup, PhotoRec, but if you are looking for a quick solution with higher recovery rate, Cisdem Data Recovery is the best choice.
- If you want to recover photos from Photos app, you can check Recently Deleted folder, restore via iCloud backup, iPhone backup or other backups, import from other library.
 Cisdem Data Recovery for Mac
Recover Deleted Photos from Photos, Trash, SD Card, etc. on Mac
- Recover both recently and permanently deleted photos within or after 30 days
- Recover deleted photos from Photos, iPhoto or other library
- Recover permanently deleted photos from Mac internal disk, external HDD, SSD, USB drive, SD Card or other storage devices
- Restore photos from iCloud
- Repair damaged photos and corrupted videos
- Recover recently and permanently deleted files under different situations
- Support 200+ file types: video, photo, document, audio, email, archive, etc.
- Preview photos before recovery
- Recover files to local drive or Cloud (Dropbox, OneDrive, pCloud, Box)
- Compatible with all MacBook Pro, Air, iMac, Mac models and macOS, including Sequoia.
 Free Download macOS 10.15 or later
Can We Recover (Permanently) Deleted Photos on Mac?
Yes, we can.
There are 2 types of deleted photos on a Mac: recently deleted and permanently deleted.
Recently deleted photos are those you move to trash bin but do not empty, or those you delete in Photos/iPhoto app but kept in the Recently Deleted folder within 30 days. A recently deleted photo can be easily put back from bin or recently deleted folder.
While those photos you delete from Recently Deleted folder in Photos app, or they are kept in this folder for more than 30 days, or you’ve emptied the trash bin, they are permanently deleted. When we permanently delete photos or other files on a Mac, it doesn’t mean that the files are completely and instantaneously erased. We just lost the portal to access to your files, which become invisible but are still stored on your Mac.
Deleting files can be done and finished in a flash, but erasing data, especially a large amount of data, takes much longer time to end, which may adversely impact your Mac’s performance and productivity. Therefore, when permanently deleting photos or other files on Mac, Mac just marks the location where your photos were saved as available to add new files. If there are new files to be added, your deleted Photos will be overwritten and may be gone forever, that’s why stopping writing to your Mac is required if you want to recover permanently deleted photos on a Mac.
How to Recover Permanently Deleted Photos on Mac (MacBook, iMac)?
We well understand that your photos have been permanently deleted from your Photos or iPhoto app on Mac, and it seems that there is no need to check the bin. But you are recommended to do so, maybe you can just find that your deleted photos lying there in the trash Bin with a different file name, or hiding there in the Recently deleted folder in Photos app.

If there is no surprise, there are 4 proven ways to recover permanently deleted photos on your Mac, even you’ve upgraded the system to the latest Sequoia.
#1 The Easiest Way to Recover Permanently Deleted Photos on Mac (MacBook, iMac, Mac)
If you are looking for an easy and quick solution for Mac photos recovery, use a professional data recovery program.
Cisdem Data Recovery is the best option, it allows Mac users recovering deleted photos directly from Photos app, from Mac internal and external storage device, also from iCloud.
Cisdem can detect and recover permanently deleted files such as photos (PNG, JPG, GIF, PSD, BMP, RAW, etc.), music files (ACC, MP3, M4A, FLAC, etc.), movies (DV, MKV, MOV, etc.), archives (ZIP, TAR, RAR, 7Z, etc.), emails and other files on Mac, external hard drive, USB flash drive, SD card and other storage devices. It works for almost all data loss scenarios: Empty the Trash, Permanently delete photos from iPhoto or Photos app, Upgrade your macOS, Format your drive by mistake…
Main Features of Cisdem Data Recovery for Mac
- Recover recently and permanently deleted files under different scenarios
- Recover deleted files from both internal and external hard drive
- Restore photos, audios, videos, documents, archives, etc., 200+ types of file
- Repair corrupted videos and photos
- Recover files from iCloud
- Create disk backup and restore files from the disk image
- Save scanning records and resume scanning at any time
- Preview recoverable items before recovery
- Save recovered files to local drive or cloud storage platforms
How to Recover Permanently Deleted Photos on Mac?
- Download and install.
Click on the button as following to download the program, then install it onto your Mac.
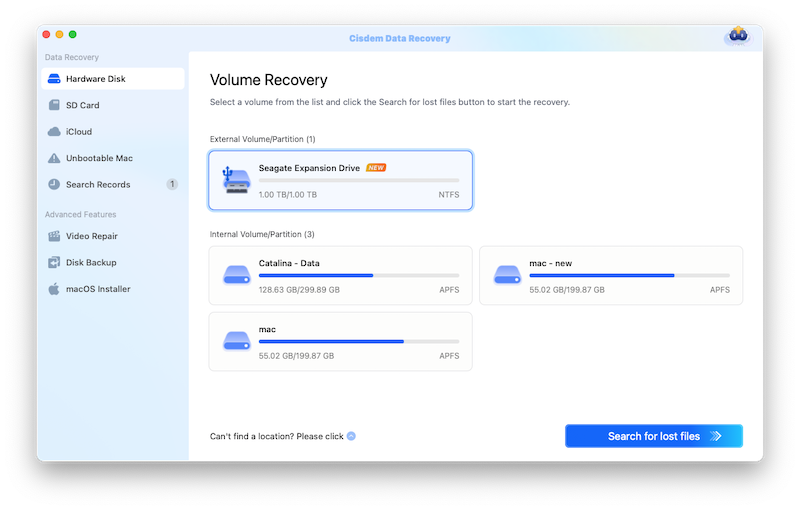
Free Download macOS 10.15 or later - Select the hard drive where you deleted or lost the photos.
Go to Hardware Disk recovery and choose the disk from the list.![recover deleted photos mac 01]()
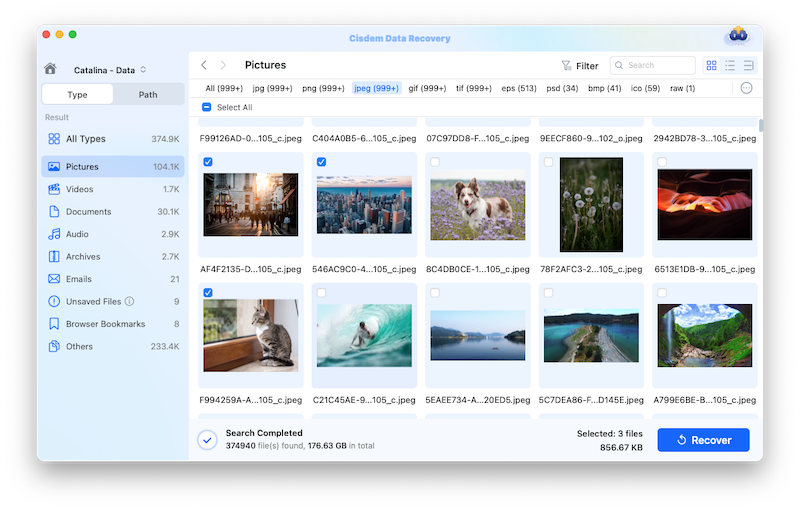
- Scan to find permanently deleted photos on Mac.
Click Search for lost file, go to Type > Pictures, select the folder of a photo format. Or you can use the filter and search box to find the deleted photos quickly.![recover permanently deleted photos mac 02]()
- Recover permanently deleted photos on Mac.
Once you are done scanning, double click on the photos to preview and pick the files that you want to recover. Then click on Recover to get the permanently deleted photos back on Mac.![recover permanently deleted photos mac]()

Tips: Recover Permanently Deleted Photos on Mac with Cisdem iCloud Recovery
If you’ve backed up the photos in iCloud and disabled the syncing, you can also use Cisdem iCloud recovery mode to restore the permanently deleted photos on your Mac.
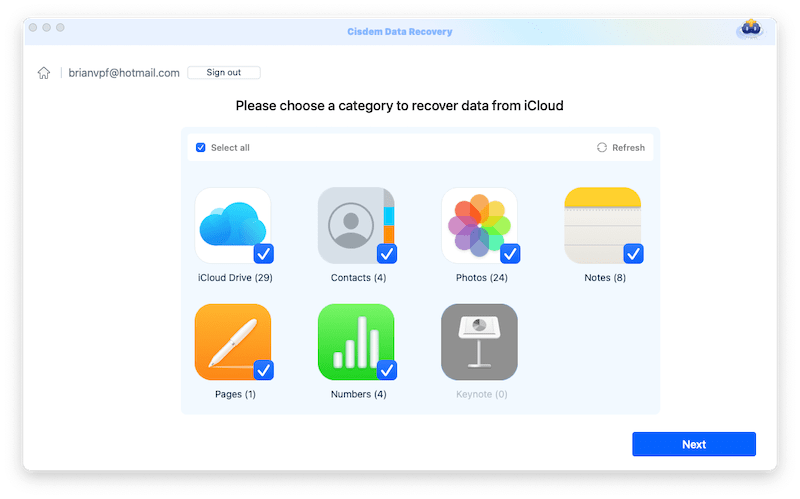
- Launch Cisdem Data Recovery, go to iCloud and choose Recover data from iCloud account, sign in.
![recover deleted photos cisdem icloud 01]()
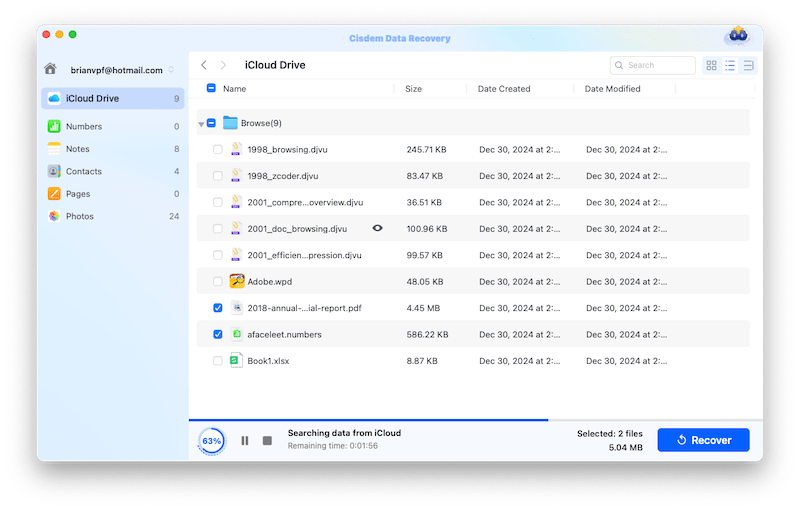
- Choose Photos or iCloud Drive where you have a copy of the deleted photos, click Next.
![recover deleted photos cisdem icloud 02]()
- Preview the photos, select and click Recover button to restore permanently deleted photos from iCloud.
![recover deleted photos cisdem icloud 03]()

Here is the video from Cisdem Official showing how to recover permanently deleted photos, starting from 00:40:
#2 Recover Permanently Deleted Photos from Mac Free with Time Machine
Time Machine is the backup application to save your files to an external storage device in case of hardware failure, malware attack, human errors or other accidents. It can be set up to backup photos, videos, documents, system files and so on automatically & regularly. If there is any data loss, you can get the files back from your Time Machine backup effortlessly. The photos will be restored to their original locations on your Mac’s hard drive.
- Connect the external hard drive you use with Time Machine to your Mac.
- From the top-right menu bar, click the Time Machine icon and select Enter Time Machine.
![enter time machine]()
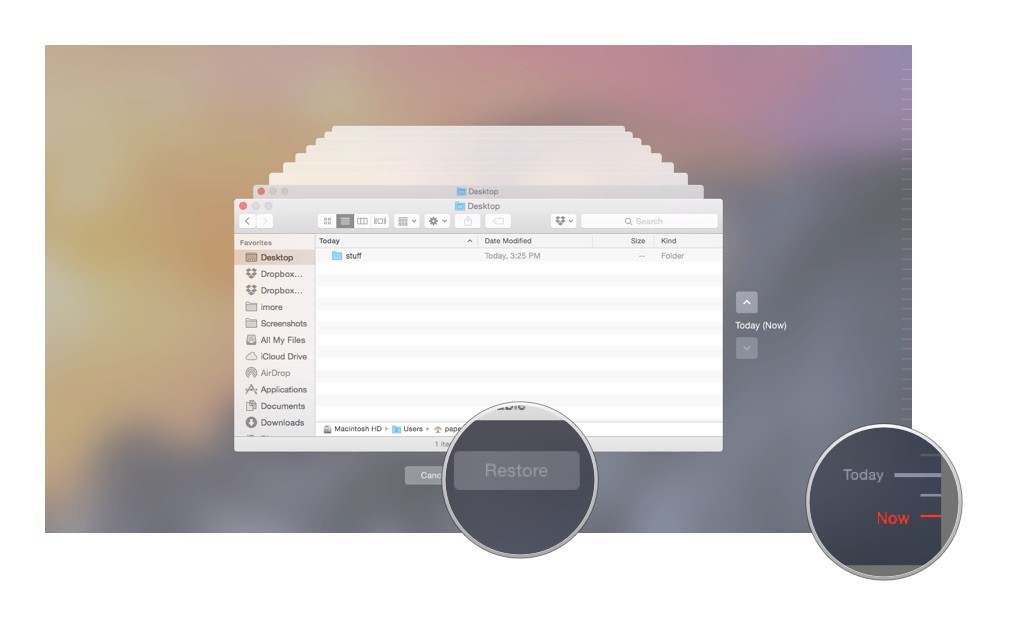
- Navigate to the folder from which you permanently deleted the photos. Once you locate the photos, select a version from the timeline and click the Restore button.
![recover permanently deleted files on Mac from Time Machine backup]()

#3 Free Recover Permanently Deleted Photos from iCloud on Mac
In the case that you have backed up the permanently deleted photos on iCloud and didn’t enable the sync feature, you can recover the Mac photos from iCloud via re-downloading. This is also very useful to recover recently deleted photos that are missing on your Mac.
- Go to icloud.com on your Mac, log in with your Apple account.
- Find iCloud Drive icon and double-click to enter it.
![restore from icloud01]()
- Find the permanently deleted photos, select it and click on the Download button to restore the photos back to your Mac.
![restore from icloud 02]()
- (Optional) If you cannot find the copies of the deleted photos, you can check Recently Deleted folder in iCloud Drive or iCloud Photos. Also, you can visit https://www.icloud.com/recovery/ to restore the deleted photos.
![recover deleted photos from icloud]()


#4 Freeware to Recover Permanently Deleted Photos on Mac
Also, we have freeware to restore your photos, it is PhotoRec. This data recovery freeware restores deleted photos, audios, videos, documents and others from both internal and external hard disk, it supports common file systems like FAT, NTFS and exFAT.
When you launch it on your Mac, it will open a Terminal window, where you can use Arrow keys to select options and press Enter for next step, based on the instructions offered on the interface. If you don’t feel confident with Terminal, then you can just ignore this tool. In some cases such as RAW photos recovery, PhotoRec won’t completely recover a file, which means you may lose a little bit of data.
- Download and install PhotoRec to your Mac.
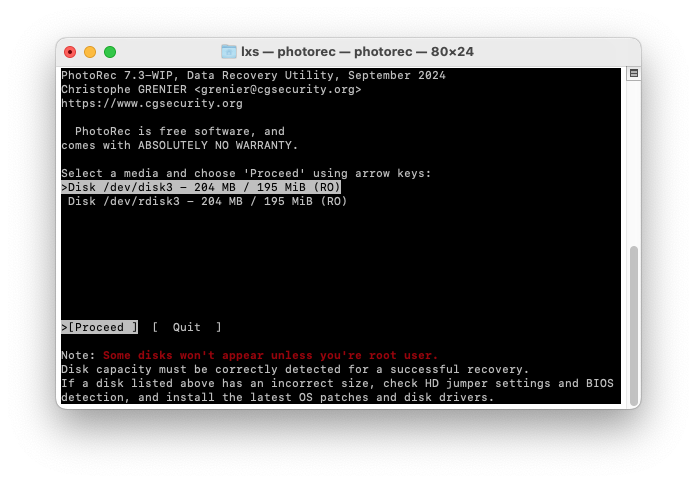
- Select the Mac disk where you saved the photos and press Enter to continue.
![recover photos mac free01]()
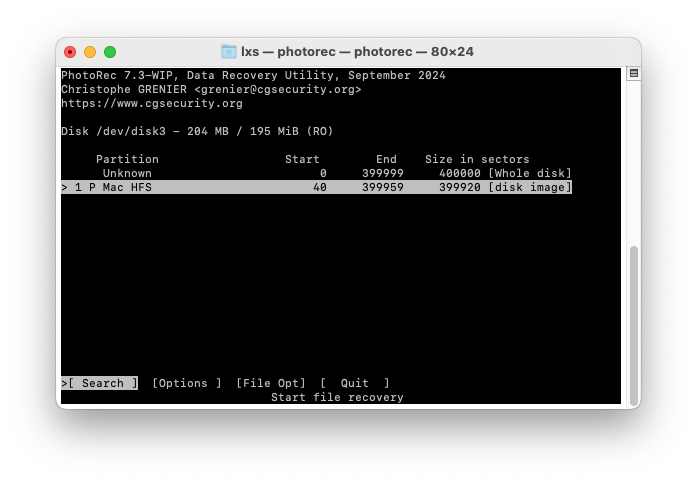
- Choose the Partition type and press Enter to continue.
![recover photos mac free02]()
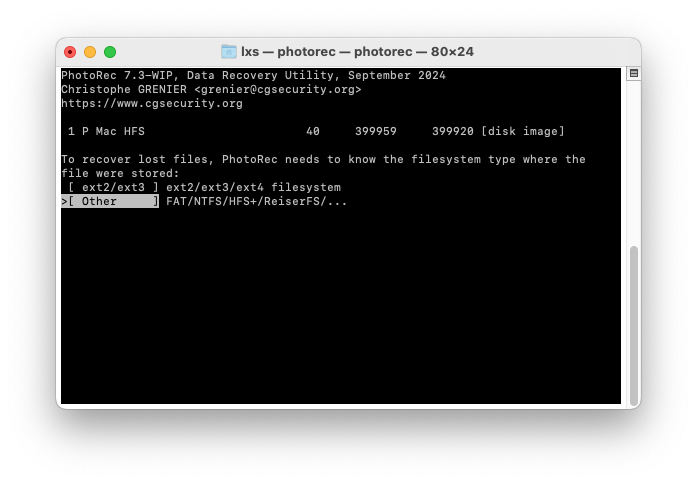
- Choose filesystem type and press Enter to continue.
![recover photos from mac free03]()
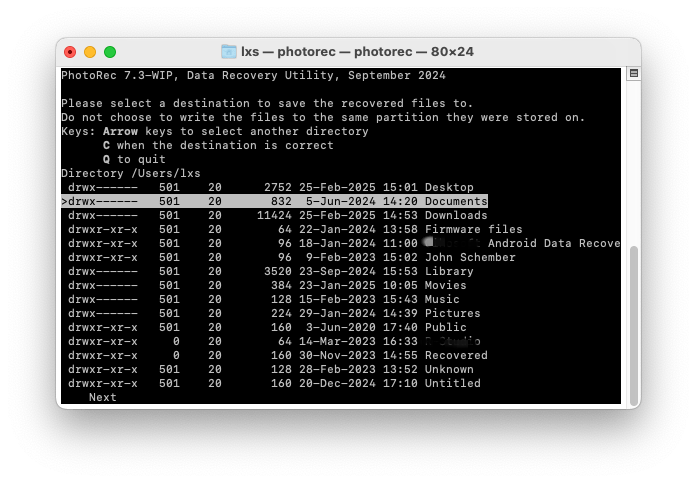
- Then choose the destination to save the recovered photos on Mac and enter C to start the photo recovery process.
![recover photos mac free04]()
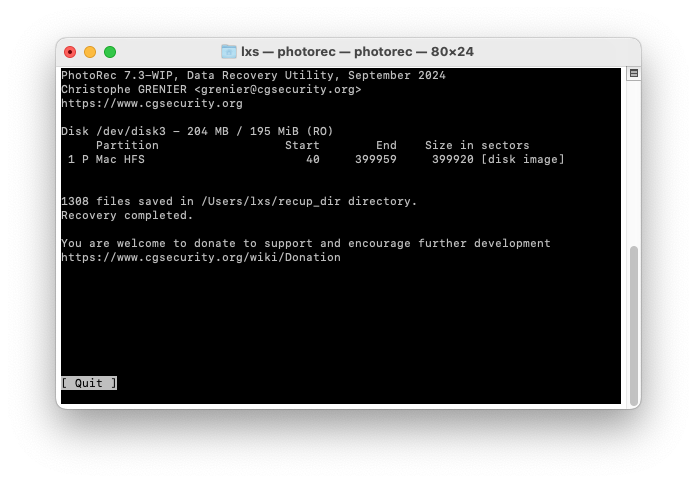
- Check the recovery status and go to the destination folder, preview the recovered photos on you Mac.
![recover photos mac free05]()
How to Recover Deleted Photos from Photos App on Mac?
Maybe you manage all your photos in just one place-Photos app, and want to focus on solutions in this case only. Don’t worry, here we will show you 4 more ways to restore deleted photos from Photos app on Mac, besides using Cisdem Data Recovery as we mentioned in Part 2.
#1 Recover from Recently Deleted Folder in Photos App
Photos app will keep the trashed photos in Recently Deleted folder for 30 days, if not exceeding, you can easily recover within Photos app.
- Open Photos app.
- Go to Recently Deleted, select the photos you want to recover.
![recover from photos app01]()
- Click Recover button.

#2 Recover from iCloud backup
If you enabled iCloud Photos sync before, but disabled it before deleting the photos on your Mac, then you can still find a copy of the deleted photos in iCloud.
- Log into iCloud Photos.
- Go to Photos > Library, select all the photos you want to restore to your Mac.
![recover from photos app02]()
- Then click Download button.

If you cannot find a copy in iCloud Library, check the Hidden album, Recently Deleted, Share Albums or iCloud Links in case you once moved or shared them.
#3 Recover from iPhone backup
Also, you should check carefully your iPhone to see if there is still a copy for the deleted photos on your Mac. Use a USB cable or Airdrop, you can easily transfer the copies to your Mac.
- Connect your iPhone to the Mac.
- Open Photos app, find your iPhone from the Device list.
![recover from photos app03]()
- Then select all the photos you want to restore your Mac and click Import. Then all the photos will be imported to your Photos Library.
![recover from photos app04]()


#4 Import from Other Library
You may have backed up the deleted photos or some photos in a photoslibrary file, but not using it as the System Photo Library, then you can import those copies in the backup photo library to your System Photo Library.
In the case you just want to restore a few photos from Photos app, you can:
- Search the backup photos library file on your Mac, the file comes with .photoslibrary extension.
- Right click on the photo library and open with Photos app.
![recover from photos app05]()
- Then select the photos you want to restore and click File > Export.
![recover from photos app06]()
- Select an output folder to save the photos.
- Then open the system photo library on your Mac from ~/Pictures/Photos Library.photoslibrary with Photos app.
- Go to File > Import, select the exported photos from backup photo library and import to your Photos app.
![recover from photos app07]()


In the case you just want to restore all the photos from Photos app via backup photo library, you can:
- Open your Photos app on Mac.
- Go to File > Import.
- Choose the backup photo library to import.
![recover from photos app08]()

#5 Recover from Other Backups
Also, you may have uploaded the copies of deleted photos to 2 or more cloud storage platforms to prevent data loss, such as Google Photos, Dropbox, OneDrive, pCloud and so on. Then you can log into your account, check the library and download a copy to your Mac again. With an easy import, you will be able to restore the deleted photos from Photos via the backup.
FAQ
1. What are permanently deleted photos on Mac?
Permanently deleted photos, are the photos that completely removed from a device and cannot be found in Recently Deleted folder or Trash bin on your Mac. They are deleted from the file directories and become inaccessible, unless you scan and restore them using a professional data recovery program. These include:
- Delete photos in Photos'/iPhoto Recently Deleted folder after 30 days
- Permanently delete photos from Mac Trash bin
- Empty Trash bin on Mac
- Delete files using rm command in Terminal
- Deleted photos are missing from Mac
2. Recently deleted photos on Mac not showing? How to find them?
If you’ve deleted the photos from Photos app, go to Recently Deleted folder. If you’ve moved them to the Trash bin, you can find the deleted photos via name, volume, kind, date created, etc, also you can enter keyword in the search box.
If you cannot locate the deleted photos in Trash, initiate the spotlight tool by pressing Command + F, then search the file on this Mac.
If none of the methods works, check back Cisdem Data Recovery to scan and restore your files.
3. Does iCloud backup include permanently deleted photos?
If the syncing feature is enabled in iCloud app on your Mac, when you permanently delete a photo from Mac, the backup file will be also removed from your iCloud account. But if you paused or disabled the syncing before deleting the photos, yes, the iCloud backup still include the permanently deleted photos and you can re-download to your Mac.
4. Is it possible to recover permanently deleted photos 10 years ago?
Yes, it is possible. But the chances are very low.
As mentioned in the first part, a permanently deleted file won’t be completely and instantly wiped out from your Mac, as long as it is not overwritten by new data, it is still recoverable. If your Mac or the drive that stored the file originally, is often used, it is not possible to recover; but if the Mac or the drive is rarely used since the deletion, it is possible to recover, especially using dedicated data recovery programs, such as Cisdem Data Recovery.
5. Can Apple support restore permanently deleted photos?
If the photos are permanently deleted from your Mac hard drive, Apple doesn’t support data recovery, for the reason of user privacy. If the photos are permanently deleted from the Recently Deleted folder in iCloud Photos, within 30 days, you can contact Apple to recover the photos; if exceeding 30 days, Apple won’t support.
6. How to permanently delete photos from photos on Mac?
Open Photos app, select and right click Delete, then go to Recently Deleted folder, select the trashed photo and right click Delete, then confirm by clicking on Delete.
Conclusion
If you have a backup of the deleted photos, Apple’s Time Machine is helpful. But if you don’t, go for a trial version of the Cisdem Data Recovery program. Download, install and launch it on your MacBook, iMac, or Mac Pro/mini, it will restore your permanently deleted photos without a hassle!

Connie Yu has been a columnist in the field of data recovery since 2011. She studied a lot of data loss situations and tested repeatedly to find a feasible solution tailored for each case. And her solutions are always updated to fix problems from the newest systems, devices and apps.

JK Tam is the lead developer at Cisdem, bringing over two decades of hands-on experience in cross-platform software development to the editorial team. He is now the lead technical approver for all articles related to Data Recovery and DVD Burner.
Sidney Winn
It is lucky for me to have a Time Machine backup. Though it requires a large-capacity drive to back up files on Mac, it is useful, especially when you lost some important files.
Renaud
I used both PhotoRec and Cisdem Data Recovery to recover my lost travel photos. I love Cisdem better. Although PhotoRec takes no money, it is much more difficult to operate in recovery process compared with Cisdem.