Subtitles are usually displayed at the bottom of the videos to make them more accessible to a larger audience. They are very important for people who are hard of hearing or can't understand foreign videos. When you have trouble watching MKV movies or TV shows without subtitles, you can integrate subtitles into MKV videos. This post will discuss how to add subtitles to MKV on Mac and Windows permanently.
 Free Download macOS 10.13 or later
 Free Download Windows 11/10/8/7
Hardcore subtitles (a.k.a. burned-in subtitles, open captions) compress the subtitle file and the video stream in the same set of data, like a watermark, which can't be separated. No matter what player and device you use to watch, the subtitles will be directly on the movie. The disadvantage is that hard subs are unable to be edited and removed.
Soft subtitles (a.k.a. encapsulated subtitles, closed captions) embed the subtitle file into the video as part of the stream. For example, MKV container incorporates video, audio and subtitle into one single file. The subtitle is embedded in the MKV video as a stream. You are capable of turning on or off these soft subs stream, as well as extract/edit/delete subtitles with related tools.
It’s more recommended to add hardcore subtitles to MKV video, as soft subtitles are not easy to integrate and fail to open in some video players.
Tips: Forced subtitles are a burned-in-text. It's applied to translate or explain segments spoken in a foreign language, symbols, slang words, flags, etc. You can also add forced subtitles to MKV movie.
Before embedding subtitles into MKV, make sure what subtitle format you want to choose. Below are some subtitle file formats:
The most widely used one is SRT, which comes with good compatibility and can be played with any device and platform.
Cisdem Video Converter is an outstanding subtitle converter to embed external SRT and ASS subtitles in your MKV video. It supports a variety of formats, such as MP4, WMV, AVI, MOV, MPEG, MP3, and so forth. So you can also integrate subtitles into other video formats.
It's not just a subtitle converter but rather an all-in-one solution for audio and video. The app helps you convert, edit, download and compress videos in any format and digitalize discs.
Step 1. Load MKV files
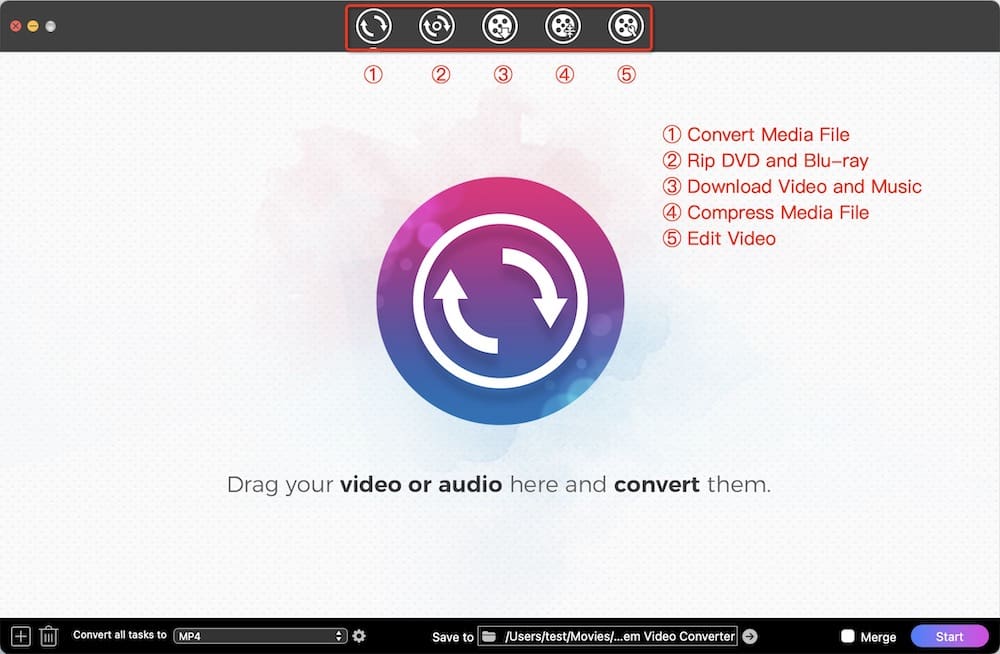
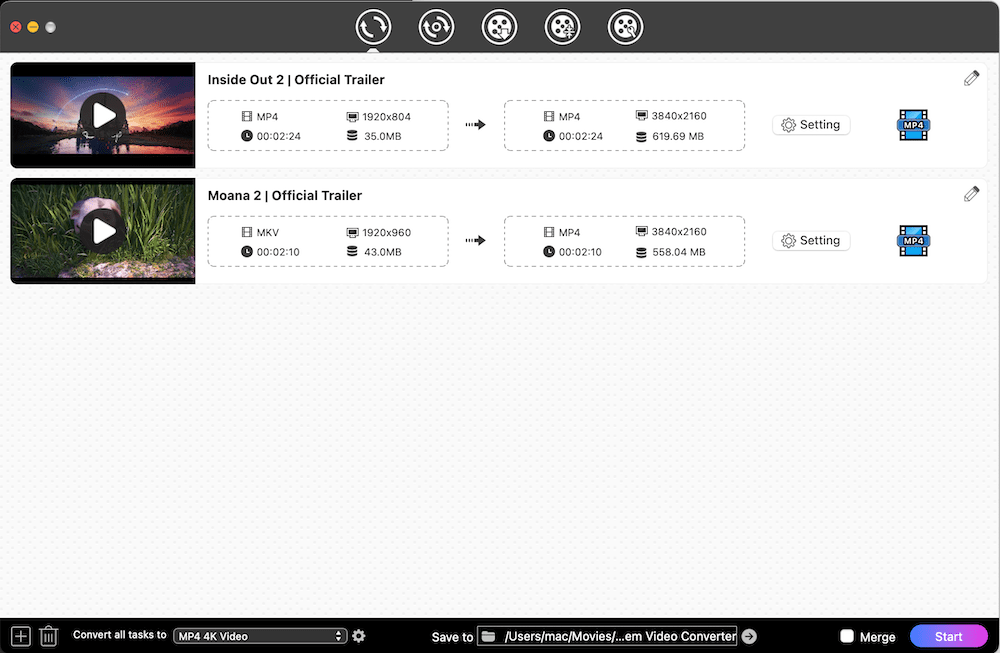
Run Cisdem Video Converter on the computer. Directly drag source MKV files into the "convert" interface.

Step 2. Add SRT to MKV on Mac or Windows
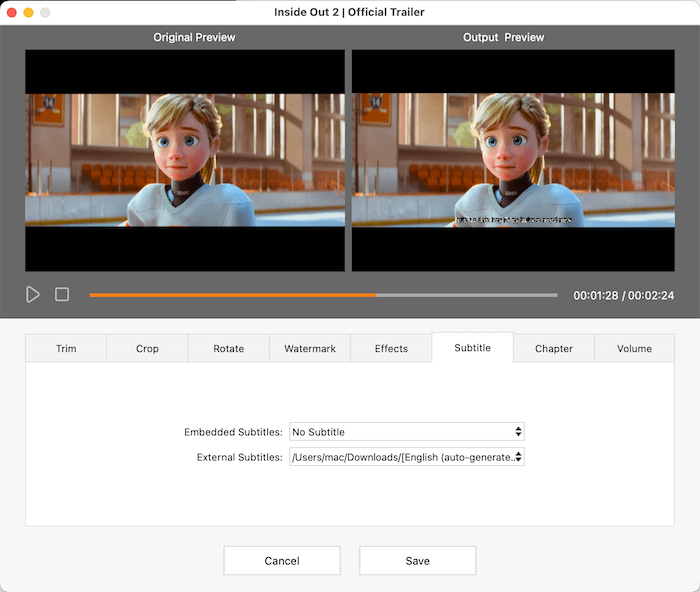
Click on the![]() icon at the top right corner, or right-click on the video and select "Edit" option, the editing window will pop up.
icon at the top right corner, or right-click on the video and select "Edit" option, the editing window will pop up.

Click "Subtitle" tab and open the drop-down box of "External Subtitles", click "Other" to import downloaded SRT or ASS subtitle file from your local folder.
Click “Save” to save your change.

Step 3. Specify the output format as MKV
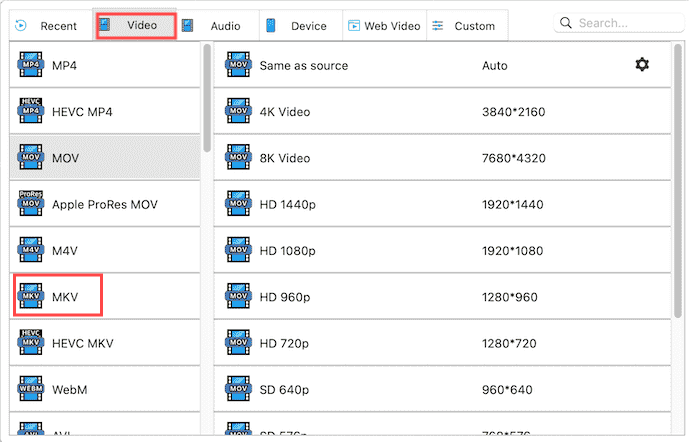
The default output format is set to MP4, thus you can click the MP4 icon to open the format list, go to "Video" category, and choose "MKV" > "Same as source ".

Step 4. Start embedding subtitles permanently
When all the settings of the imported videos are completed, hit the “Start” button to embed external subtitles to MKV on Mac or Windows PC.
VideoLAN VLC can be used as MKV player for Mac and Windows, but you have neglected its ability to embed subtitles to video. It doesn't mean simply clicking "Add Subtitles File" on the top menu while playing MKV files. This function is not a permanent embedded subtitle, and all media players can do it.
The program supports a long list of caption formats, like MicroDVD, SubRip, SubViewer, OGM, VobSub, etc.
Now, take Windows operating system and VLC 3.0.8 as an example, see how to add SRT to MKV on PC.


Don’t open the export file that appears immediately. Wait a moment. If your MKV video is 5 minutes, then please wait for more than 5 minutes.
In addition, VLC works differently over various machines and versions. It's may fail to embed subtitles into MKV on your Mac or Windows computer.
Clideo.com is an online service to merge/compress/resize/cut/speed video, add subtitles to video and make video meme.
It's a fast way to add subtitles to MKV. You can manually or straightly add the SRT file. Also, you can choose a font, size, align the text, as well as set the subtitle start time and end time.


You need to spend $9 per month, $72 per year to remove the watermark. The free version can’t upload a video longer than 10 minutes, otherwise it will prompt "Error: Your browser dropped the connection while uploading the file". But a complete MKV movie is at least 90 minutes long.
MKVToolNix is an open-source toolkit to add subtitles to MKV on Mac, Windows, and Linux. It's able to merge SRT, SUB, and IDX subtitle files with MKV movies without re-encoding.
Moreover, you can use MKVToolNix to create, split, mux, demux, extract, inspect, and edit MKV videos.
But the exported video files are a bit stuck when playing.

To add subtitles to videos via command-line, you should use 2 tools - Terminal app and FFMPEG open-source software project.
Additionally, you also need to know some code technology. The commands are alive. When you find that they are unavailable or have an error, you can flexibly modify them.
Here are the steps I took to successfully remux subtitles into MKV.

Have you decided which way to choose to add subtitles to MKV on Mac and Windows permanently? Cisdem Video Converter, VLC, and Clideo.com will help you add hardcore subtitles to videos, whereas MKVToolNix and FFMPEG are good to integrate soft subtitles to MKV videos. My choice is Cisdem subtitle converter and MKVToolNix. They are easy to use and finish tasks quickly and smoothly.

Emily is a girl who loves to review various multimedia software. She enjoys exploring cutting edge technology and writing how-to guides. Hopefully her articles will help you solve your audio, video, DVD and Blu-ray issues.

