M4A, one of the popular audio formats widely used by Apple devices like iTunes, which is well-known for taking up small capacity on devices. However, its quality get compromised to some extent. If you want to enjoy cubic sound quality, the easiest way is to convert it to WAV, another popular audio format with high quality. If you want to know how to convert M4A to WAV on Windows 10/11 and Mac, read this article to get one solution that matches you most.
If you are looking for the best M4A to WAV converter for Windows or Mac, Cisdem Video Converter is a completely powerful converter available for you that supports working on Windows (11, 10, 8 and 7) and Mac. It can quickly convert MP3, M4A, WAV, FLAC, OGG and almost all popular audio formats without need to download third-party tool.
Besides making conversions among audios, it can also extract audio from videos (MP4, AVI, MOV, MKV, WebM, etc.), rip audio from DVD and Blu-ray, and download online video to audio-only format. Moreover, it can convert them to any audio formats that it supports. Although it offers diverse functions, it is designed with a simple and easy-to-understand interface, allowing everyone to master it in seconds.
This part aims to show the steps on how to change M4A to WAV on Windows 10/11. Mac users can also refer to the steps as both Mac and Windows version share the similar feature, function and configuration.
 Free Download Windows 11/10/8/7
 Free Download macOS 10.13 or later
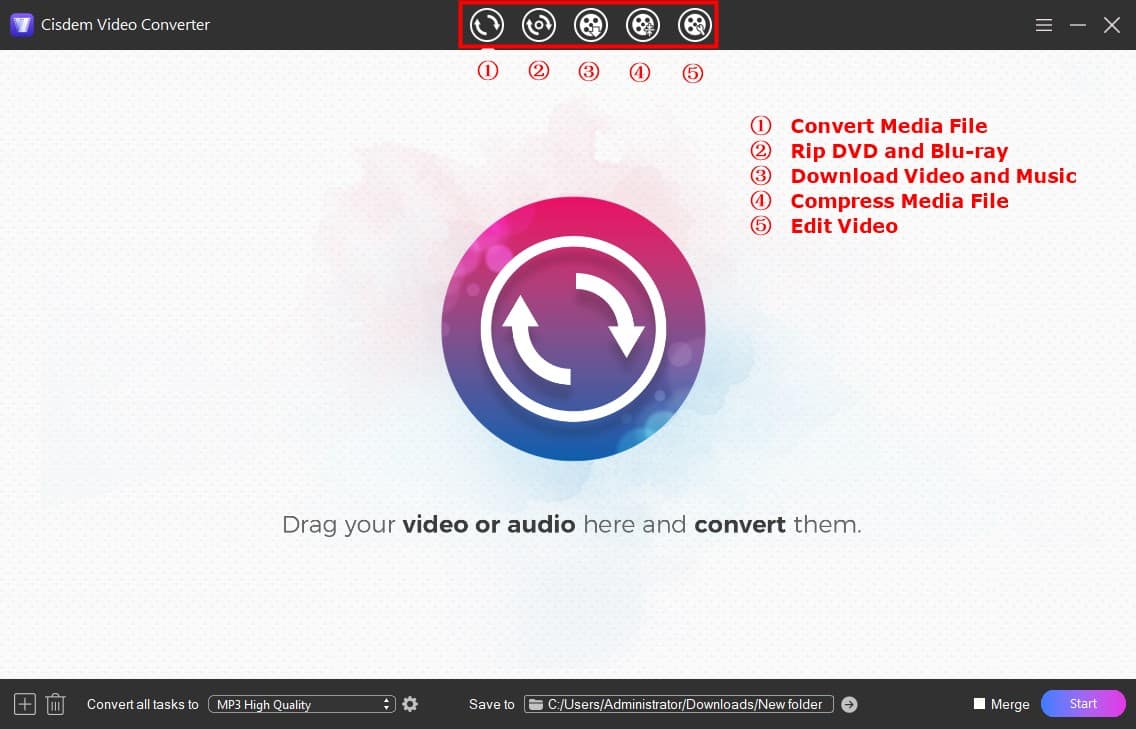
Download the latest version of Cisdem Video Converter, install and open it.
Stay at the default interface for conversion, directly drag and drop all M4A files that you want to convert, as it supports convert multiple files without limitation.

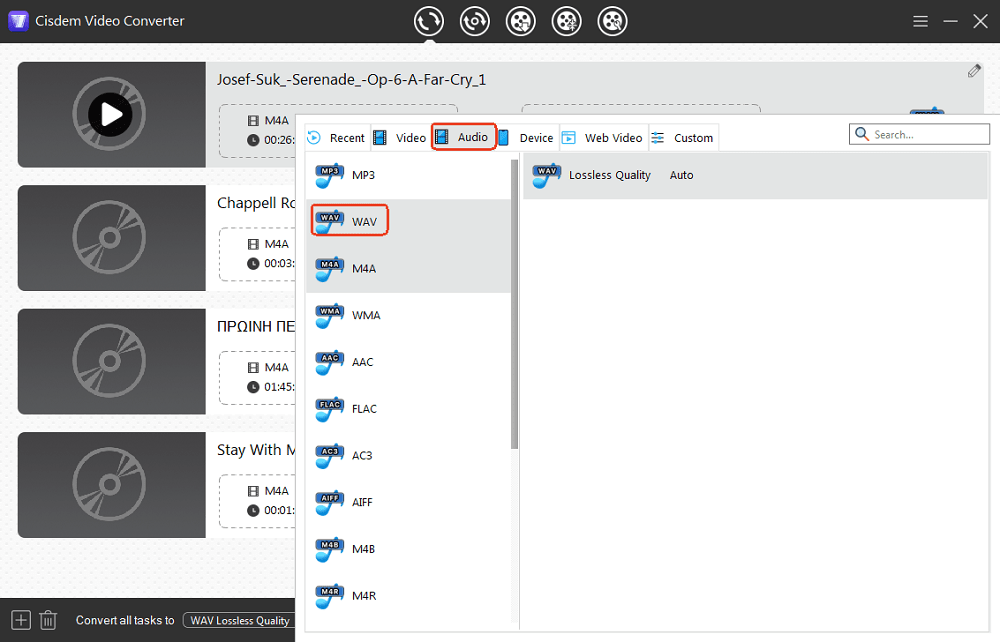
There are 2 entrances that link to the expanding format list.
One is to click the highlight format button on the video panel, which requires you to set the format one by one. So it is more suitable for only a few videos to convert, or to select a different output format when you have multiple files to convert.
The other is to click on the drop-down icon of “Convert all tasks to” button on the bottom left corner. To do so, you can select the format for all files in one click.

Then, click on “Audio” > “WAV”> "Lossless Quality" on the popped-up list.
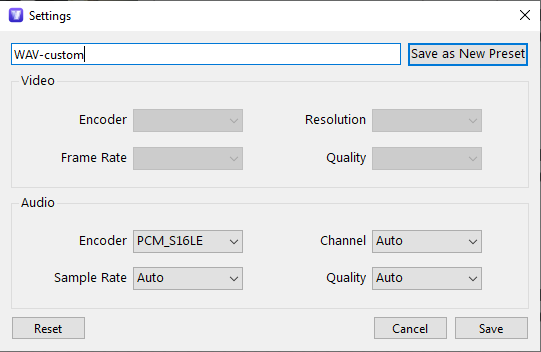
Also, click on the gears icon that next to the selected format option, you can adjust the file settings like codec, audio quality, sample rate and channel.

Hit on “Start” icon on the bottom right corner to start the batch-processing tasks. Once converted, tick out “Checkmark”![]() icon to find the just converted file on your local folder.
icon to find the just converted file on your local folder.
Audacity is being widely acquainted as a free and cross-platform recorder and audio editor. Actually, it can also convert audio formats or extract audio from some video formats. But, it originally supports a few audio formats such as WAV, AIFF, FLAC, MP2, MP3, and OGG. If you want to change M4A audios to WAV with Audacity, you should download and install the matched ffmpeg library to make more formats available.
Also, if you don’t want to install extra tool, you are also allowed to record M4A to WAV by using its built-in recording function. But Audacity is not easy to use for the first-time users because its interface is covered with various icons without detailed instruction, confusing people at a loss.


tips: if you convert multiple files at the same time, select “Export Multiple” option in the step 4, and then follow the instruction to select the location, output format, bitrate, quality, channel, etc. Otherwise, all tracks will be mixed together and exported as one stereo file.
Some people reported that there is no download link of FFmpeg library while resetting the preferences. If you encounter this problem, you can solve it by manually downloading FFmpeg library. Details are as follows.

However, if the upper solution still doesn’t work, you’d better switch to other simple and useful ways convert M4A files.
Don’t be misguided by the name, VLC Media Player is also excellent at converting popular videos and audios. Since VLC is an open-source and cross-platform program, it does a decent job in converting M4A to WAV for free on Windows 10, Mac and Linux. However, because conversion is a hidden feature of VLC, it may be a little difficult for people to find the entrance and use it for the first time.


tips: The Windows version of VLC Media Player supports converting M4A to WAV in batches. But, this feature doesn’t permit people to choose their wanted storage place or name at will.
Every Mac user must be familiar with iTunes, a default application for Mac, which is a useful media player, library and management. It can also convert files, which supports WAV, Apple Lossless (M4A), AAC, AIFF and MP3 format, keeping you from downloading extra converter software. Plus, iTunes also works on Windows 10 and Windows 11.


But, if the M4A still doesn’t exist in iTunes library, the direct solution is to click on “File > Add to Library” on the top again, select the M4A file for conversion and click on “Open” button to upload it to iTunes. Then, follow the upper instruction to make conversion.

If you are looking for a complete free M4A to WAV audio converter for Windows and Mac, Fre:ac is a great program that can make conversions among MP3, M4A/AAC, FLAC, WMA, WAV, etc. Also, it can extract audio from videos and rip audio from CD discs. At the first sight of the program, you may think that it is complicated because of the outdated interface. However, after figuring out the icons, it becomes easy to operate for users. And it supports converting multiple audios at a time.


MP3Cutter.com is specially designed to handle audio files, which can be used to cut file length, merge several files into one large file and convert audios. Except for MP3, it supports OGG, WAV, AIFF, M4A and other 50+ audio formats. Compared to other free online M4A to WAV converters, it is superior in supporting batch-conversing and download the new files as a ZIP simply.


MConverter is a powerful all-in-one online converter that is capable of converting videos, audios, archives, documents, e-book, minecraft and subtitles in various formats. And it lists all supported formats on its web page. This online M4A to WAV converter is the easiest one that I have tested, which can automatically start the conversion and download the converted files after uploading the files and selecting the target format.
But its free version can only batch download 2 files at once, limit the file under100 MB and only convert 10 files per day. If you want to experience all its features without limitation, you’d better upgrade to its paid version.


Yes but not recommended. In fact, Windows Media Player doesn't provide a conversion function. But, because it offers a ripping feature, Windows Media Player can achieve it by utilizing a CD disc whose process is more difficult than normal conversion process. It needs to burn M4A files to a writable CD at first and then rip the CD content to WAV format.
Yes, below are the simple steps:
This article has illustrated 6 awesome ways to convert M4A to WAV on Windows 10 or Mac easily. If you don't want to install additional application, the online converters are great options. But thinking of simplicity, features, performance, stability, etc., Cisdem Video Converter absolutely defeats the other ways in all aspects.

Emily is a girl who loves to review various multimedia software. She enjoys exploring cutting edge technology and writing how-to guides. Hopefully her articles will help you solve your audio, video, DVD and Blu-ray issues.

