So you have a Mac and installed the latest macOS, but still want to run an earlier version for some reasons, or you want to have a try on the latest Sequoia beta version, but worry about its instability in this testing process? You are in luck, creating a bootable installer would be helpful, and it can be much easier than you think.
In this article, we will run through the reasons why create a bootable macOS installer, how to pick a bootable media, and the instructions of creating a bootable installer for macOS manually with commands or easily with several clicks.
Easily Create Bootable macOS Installer within Clicks
- Create bootable installer for macOS Sequoia, Sonoma, Ventura, Monterey, Big Sur, Catalina, Mojave, High Sierra
- Download the installer from AppStore or import from selected disk
- Highly compatible with various external drive
- Easy and quick to create macOS installer
- Recover deleted, lost, formatted data under different situations
- Repair damaged video, photo and document
- Recover files from iCloud
- Recover data from unbootable Mac
- Create disk backup
 Free Download macOS 10.9 or later
What is A Bootable Installer for macOS and Why Create?
A bootable macOS installer is a device that contains an operating system and allows a Mac to directly boot from, in most cases, it is a flexible external drive, such as USB drive. It can start a Mac without using the start-up disk.
Probably the most common reason of creating a bootable installer for macOS is to run an application that you rely on very much but cannot work properly with your current macOS. Also, a bootable installer is created due to following reasons:
- You want to experience the new features in macOS Sequoia beta, but there is risk of directly installing this buggy and unstable version on your machine;
- You are a software developer and need to test your program on different versions of macOS to troubleshoot the compatibility issues;
- You Mac won’t boot or the system crashes for unknown reason, the bootable installer will help you boot Mac successfully and recover the failed system, also access your files and backup them before they are gone forever;
- You need to install a new macOS onto a brand new Mac quickly;
- You want to make sure a macOS works perfectly on your Mac before downgrading or upgrading to that version, because it takes time;
- You need to install macOS on Windows or other operating systems;
- You need to install and run 2 or more macOS versions alongside.
How to Pick A Bootable Drive for The macOS Installer?
The device used to create a bootable macOS installer should be picked carefully.
First, we recommend a flash memory stick that is lightweight and fast at reading/writing.
The device should also be clean without malware or virus. Surely, it must function properly, it can connect, mount and show up without any problem.
Use a 32-GB drive. Most of the macOS installers takes a space of approx 8GB to 16 GB, so 32GB will be enough to create a bootable installer on the disk.
The bootable drive should be in a file system that is supported by your Mac, otherwise, your Mac won’t be able to read and load data from the drive.
Also, the bootable drive should be empty, since it needs to be wiped before the installer creation. You can move the files on it to another storage device or upload to your cloud storage account.
Easily Create Bootable Installer for macOS Sequoia, Sonoma, etc.
macOS offers a native solution to create bootable installer using Terminal (you can find the steps in the next part), the process involves 3 main steps and users who are not familiar with Terminal commands may find it difficult. If you are looking for a quick and easy solution to create the installer on your drive, Cisdem Data Recovery helps on this.
Cisdem Data Recovery is a professional program to retrieve deleted or lost data on a Mac or Windows PC, also it recovers files from external storage devices that connected to the computer. More than 1000 types for files can be restored by this program, including office document, iwork files, videos, screen recordings, photos, emails, archives, bookmarks and so on. Not only gets the deleted files back to your local or cloud drive, Cisdem also repairs damaged photos, videos and some documents. In addition, it can create disk backup image for file recovery when necessary.
macOS Installer is one of its advanced features, because it can offer a feasible solution for data recovery when your Mac won’t boot. It allows users to create a bootable macOS installer within a click. There are 2 options to choose a macOS installer, downloading from Mac AppStore or importing from a disk on your Mac. And it does the creation quickly even for Mac beginners or users that are not tech-savvy.
How to create bootable installer for macOS in Cisdem?
- Connect the external drive to your Mac.
- Download and install Cisdem Data Recovery.
Free Download macOS 10.9 or later - Launch Cisdem Data Recovery and go to macOS Installer, make sure it detects and shows up the external drive.
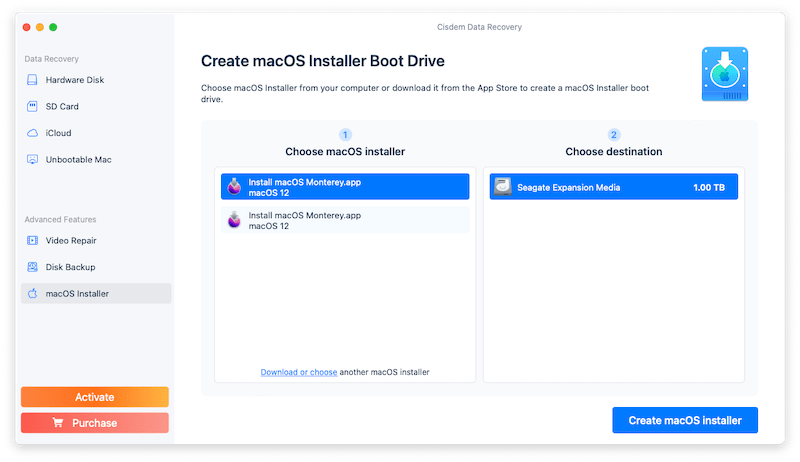
- Select a macOS Installer, or directly add the installer from your Mac.
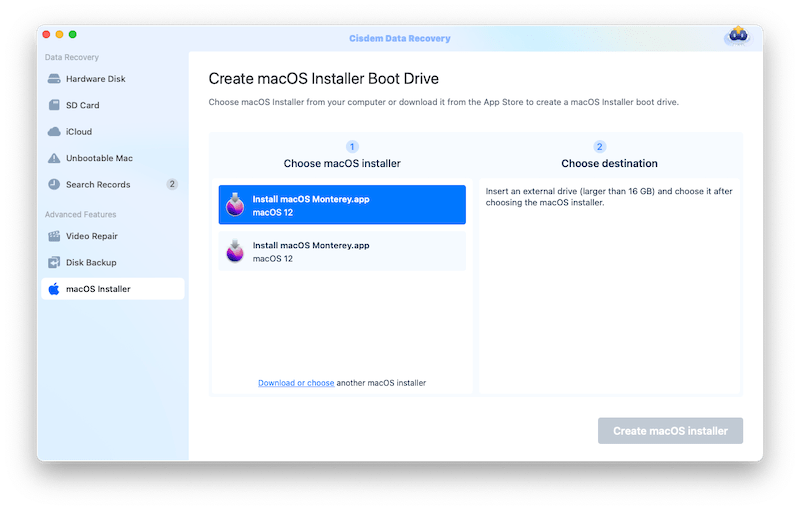
- Then choose the drive and click Create macOS installer.
- Wait for the creation to finish, then remove the bootable installer from your Mac safely for later use.
How to Create Bootable Installer for macOS Manually?
Back to the native way of creating a bootable macOS using Terminal, there are 3 main processes, here we will list all the steps in details. In this solution, you will be asked to enter commands, just copy and paste to avoid any typo. Also be careful when entering the name of your bootable media, in case of any mistake, the creation might run into errors and stop.
- Download the macOS installer from Mac App Store or other reliable sources. Here is the direct links you can use to get the installer:
macOS Sequoia Beta: https://apps.apple.com/us/app/macos-sequoia-beta/id6499230573
macOS Sonoma: https://apps.apple.com/app/macos-sonoma/id6450717509
macOS Ventura: https://apps.apple.com/app/macos-ventura/id1638787999
macOS Monterey: https://apps.apple.com/app/macos-monterey/id1576738294
macOS Big Sur: https:///apps.apple.com/app/macos-big-sur/id1526878132
macOS Catalina: https://apps.apple.com/app/macos-catalina/id1466841314
macOS Mojave: https://apps.apple.com/app/macos-mojave/id1398502828
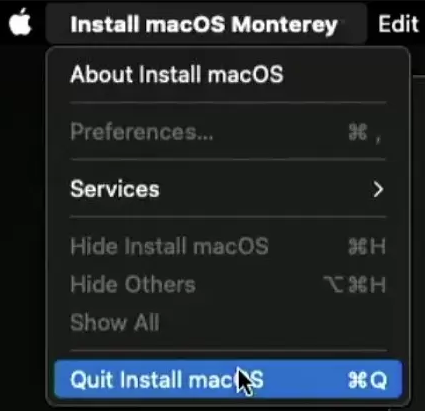
macOS High Sierra: https://apps.apple.com/app/macos-high-sierra/id1246284741 - Make sure the installer in the correct name Install macOS XXX. If the installer auto starts installation after downloading, you should Quit Install macOS and save it as an installer app, instead of .dmg or .pkg format.
- Connect the external drive to your Mac. In the process of installer creation, the drive will be automatically erased, so you don’t need to format with additional time.
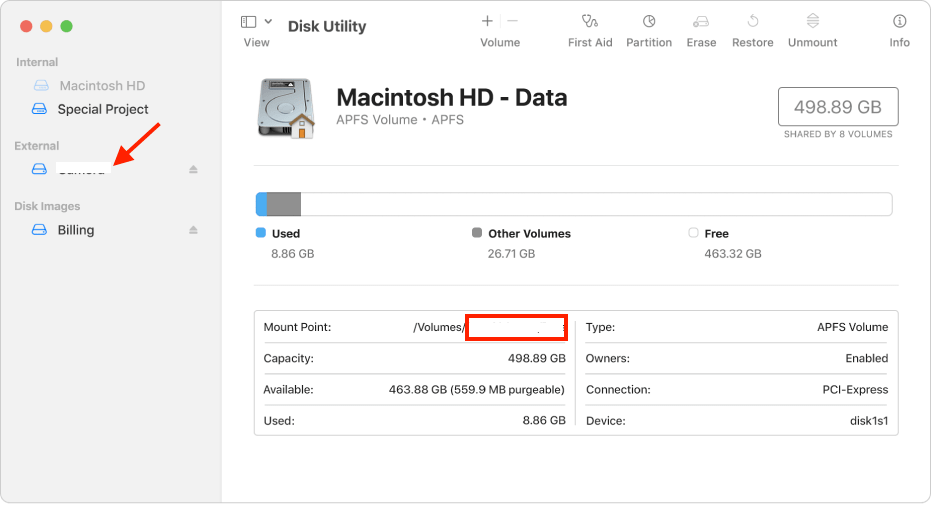
- Find the name of your external bootable media in Disk Utility > Mount Point.
- Open Terminal.
- Enter the commands as follows basing on different macOS versions. You need to replace MyVolume in the following commands with your own that found in step 4.
(For Sequoia) sudo /Applications/Install\ macOS\ Sequoia\ beta.app/Contents/Resources/createinstallmedia --volume /Volumes/MyVolume
(For Sonoma) sudo /Applications/Install\ macOS\ Sonoma.app/Contents/Resources/createinstallmedia --volume /Volumes/MyVolume
(For Ventura) sudo /Applications/Install\ macOS\ Ventura.app/Contents/Resources/createinstallmedia --volume /Volumes/MyVolume
(For Monterey) sudo /Applications/Install\ macOS\ Monterey.app/Contents/Resources/createinstallmedia --volume /Volumes/MyVolume
(For Big Sur) sudo /Applications/Install\ macOS\ Big\ Sur.app/Contents/Resources/createinstallmedia --volume /Volumes/MyVolume
(For Catalina) sudo /Applications/Install\ macOS\ Catalina.app/Contents/Resources/createinstallmedia --volume /Volumes/MyVolume
(For Mojave) sudo /Applications/Install\ macOS\ Mojave.app/Contents/Resources/createinstallmedia --volume /Volumes/MyVolume
(For High Sierra) sudo /Applications/Install\ macOS\ High\ Sierra.app/Contents/Resources/createinstallmedia --volume /Volumes/MyVolume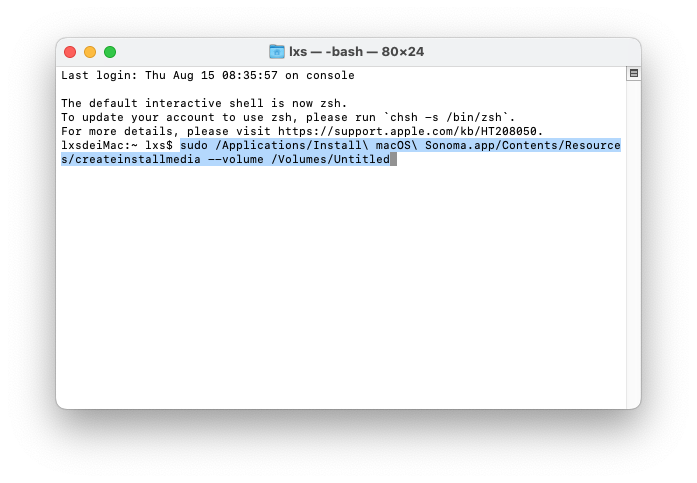
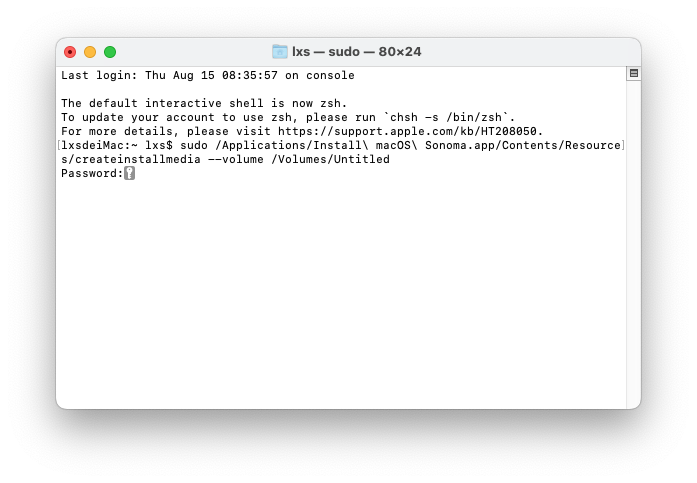
- Press Enter.
- Then enter your password and press Enter to continue the process.
- Enter Y to erase the bootable media, then press Enter.
- Click OK to proceed with the installer creation.
- Once the creation finishes, quit Terminal and remove the bootable media from your Mac safely.
- (Optional) To use the bootale installer, you need to turn off the Mac first, then connect the bootable installer to your Mac. Turn on the Mac and hold Option button (or Power button on Apple silicon Macs) until you see the bootable installer. Select it and Continue by following onscreen instructions.
Extended: Tips to Use The Bootable Installer for macOS after Creation
To use the bootable macOS installer on your Mac and boot from this drive, there are some tips to keep in your mind, so you can install it without hassle.
1. Your Mac should be compatible with the macOS on the installer, visit the macOS page on Apple and check the supported Mac models for each macOS version.
2. The Mac should connect to the Internet, though you don’t have to download the macOS, the installation process requires Internet connection to get firmware or other related information from your Mac.
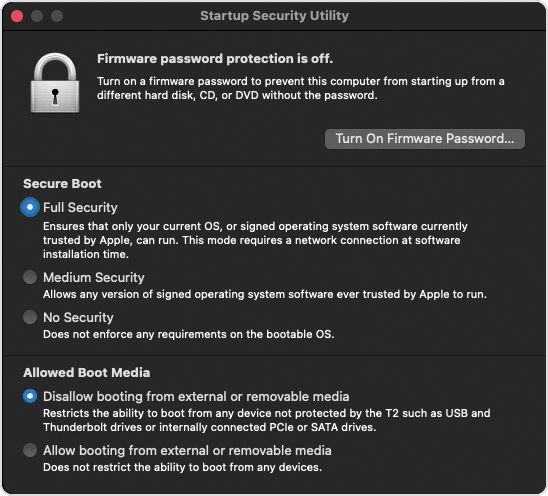
3. In the case your Mac uses T2 Security Chip, you need to change the settings in Startup Security Utility and allow booting from external or removable media:
- Turn on your Mac, press and hold Command + R after you see Apple logo to enter Recovery mode.
- Select the user and enter password.
- From the macOS utilities windows, choose Utilities > Startup Security Utility.

- Enter the password to authenticate.
- Then check before Allow booting from external or removable media.

Connie Yu has been a columnist in the field of data recovery since 2011. She studied a lot of data loss situations and tested repeatedly to find a feasible solution tailored for each case. And her solutions are always updated to fix problems from the newest systems, devices and apps.
Loved the article, share!