
How to Delete Duplicate Files in Windows 11: Step-by-Step Guide
 366
366
 0
0


Duplicate files slow down our computers. Sometimes, we can delete them one by one manually if they are located in the same folder. The problem is that most duplicate files created by the computer or by ourselves are scattered in different locations, which makes it difficult for us to find them. This article will show you different ways on how to delete duplicate files in Windows 11, automatically or manually.
 Cisdem Duplicate Finder
The Best Duplicate File Remover for Windows 11
- Identify duplicate photos, videos, audios, docs and all other duplicate files
- Find duplicate files on computer, phone, external hard drive, SD card, etc.
- Find duplicate files in iTunes and Microsoft Photos
- Let you scan 1 or multiple folders/drives for duplicate files at a time
- Let you exclude folders/files (e.g. system folders) from the scan
- Display the found duplicate files for you to view and preview
- Automatically select all duplicates for you to delete with a click
- Let you select/deselect manually
- Also offer 9 rules (e.g. Select Newest) to help you mass select/deselect
- Safe and easy to use
- Compatible with Windows, Mac, Android and iOS
 Free Download Windows 10 or later
  Free Download macOS 10.11 or later


Does Windows 11 itself have a built-in duplicate file remover?
It's no. Because Windows 11 doesn't have a built-in tool for this purpose. So, if you want to easily remove all duplicate files in your system, you can find a third-party application that is helpful. There many tools that can help users find duplicate files. Not all apps will meet your needs for accuracy and efficiency. You can do some search and study to find the one that can be the best for you. And, Windows 11 has some features that may help you manage duplicates, but its process can be a little bit time-consuming maybe. Read on to learn how to clean up duplicates with these methods.
What is the best app that finds all duplicate files in Windows 11?
Duplicate files on computer including duplicate photos, videos, audios, documents, archives, etc. Cisdem Duplicate Finder is the best app that can find all types of duplicate files in Windows 11. It identifies exact duplicate files based on the file content, regardless of their file names. You can scan a singer folder on your computer for duplicates. It also allows you to scan duplicates across multiple computer folders, or the entire hard drive.
To delete duplicate files in Windows 11 using this professional duplicate file remover:
1. Download and install Cisdem Duplicate Finder on your PC.
Free Download Windows 10 or later
2. Open it. To scan specific folders for duplicates, click the plus icon on the main window and select the folders you want to scan. Click Open.
You can also select all drives on your Windows 11 to search for all duplicate files.
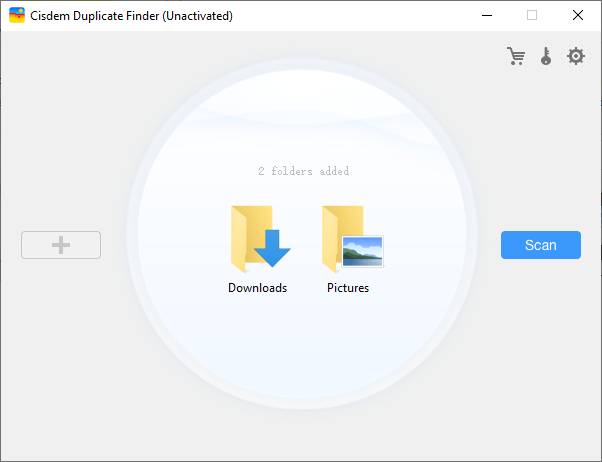
3. Click Scan.
4. It’ll show you search results soon and categorize the found duplicates by file types. You can compare the duplicates side by side, and view their details such as file names, file size, location, resolution, and more.

5. It automatically marks all but one file from each group of duplicates for remover. Also, you can choose a desired selection rule to help you mass select files to remove, such as “Select Oldest”.

6. After checking the marked duplicate files, click Delete.
The deleted files will be moved to the Recycle Bin in Windows 11 by default. You can also go to the Settings of this duplicate file remover and set up other remove method: Remove permanently or Move to a certain folder.
Tip 1: To prevent users from deleting important files (such as system files or files in backup folders), Cisdem Duplicate Finder provides an ignore list that allows you to exclude certain folders and files from scanning. You can also let this tool ignore system hidden folders and files, certain file formats, set minimum and maximum file size to scan.

Tip 2: Duplicate photos can take up a significant amount of storage space on computer. Some of them are unnecessary near-duplicate images, such as different versions of the same image. Luckily, except for exact duplicates, this duplicate file remover for Windows 11 also helps find near-duplicate photos.

How to find duplicate files in Windows 11 free using File Explorer?
If you think that you don't want to use a third-party application that to help you find duplicate files in your Windows 11, you may can try this method. As you may know, File Explorer is an application that is in Windows that can help users access files on their computer. And with it, you can search for files based on your needs, such as files that share a same name or similar name. And it also lets you to sort files in the order you need.
However, this method cannot delete all duplicate files in Windows 11. It is more suitable for those who need to search for duplicate files in a certain folder and the number of files is not large. The process may be a bit time-consuming compared to Method 1.
1. Type indexing options on the Windows search bar. Open the Indexing Options app.
2. Click the Modify button in the bottom left corner.
3. On the next window, click Show all locations.
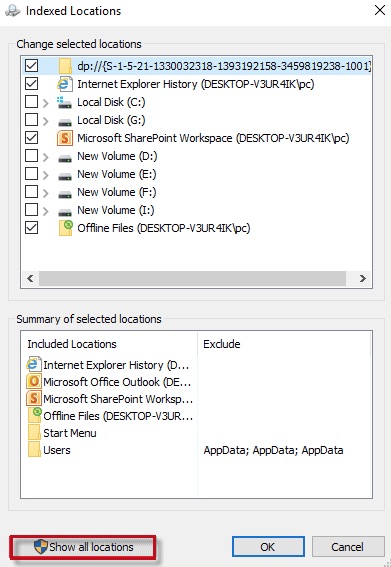
4. Check the all boxes under Change selected locations. Click OK.
5. Press Windows + E keys on your keyboard to open the File Explorer.
6. Open the Users folder by going to This PC > Local Disk (C:) > Users.
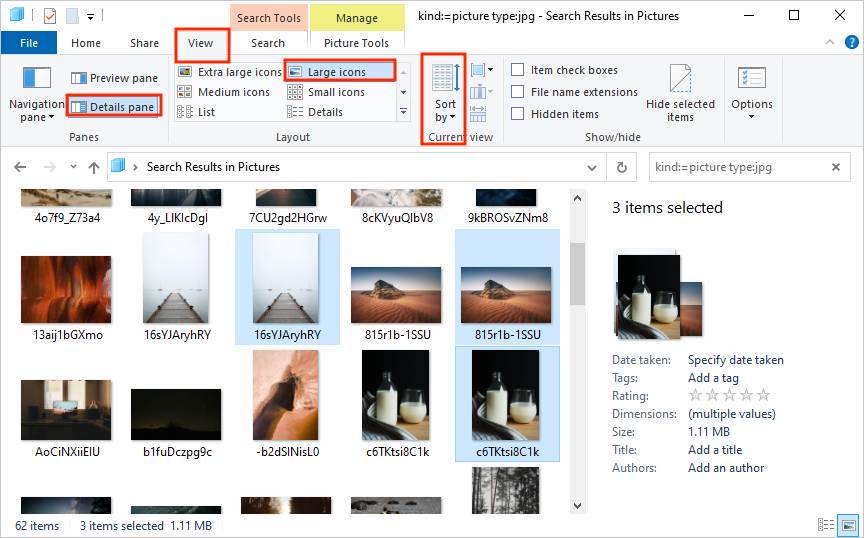
7. Click the View tab at the top of the window. Select Preview pane.
8. In the Layout section, select Details. If you want to search for duplicate images in Windows 11, select Large icons.
9. Expand the Sort by option. Select Size and Ascending.
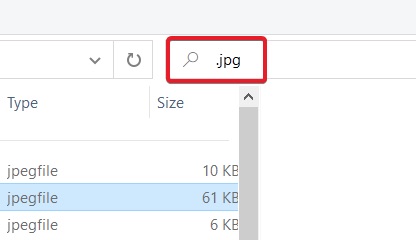
10. Go to the search bar in the upper right corner of the window and type in the extension of the file you want to find, such as jpeg, mp3, doc, exe, etc.
11. Now you can manually identify duplicate files on your Windows PC and remove them one by one. Pay attention to the files that have the same file size or have "Copy" in the file name. Control-select the unwanted files. Right-click on them and choose Delete.
The deleted duplicates will be moved to the Recycle Bin too.
How to delete duplicate files in a folder in Windows 11 using PowerShell?
This method is for tech-savvy users only. PowerShell is a program from Microsoft. It is used to automate tasks and simplify configurations in the Windows ecosystem. It can also be used to search for duplicate files by calculating the hash value of the files.
I have successfully used this tool to find all duplicate files in the Document folder on my Windows 11. But I would not use it to find duplicate files in some important folders. It does not allow users to preview files before deleting.
1. Type PowerShell on the Windows search bar. Open it.
2. Type cd followed by the folder location where you want to find duplicate files. For example,
cd C:\Users\Administrator\Documents
3. Hit Enter.
4. Paste the command below, which is for calculating the hash of the files.
Get-ChildItem -Recurse | Get-FileHash | Group-Object -Property Hash | Where-Object { $_.Count -gt 1 } | Select-Object -ExpandProperty Group | Select-Object -ExpandProperty Path
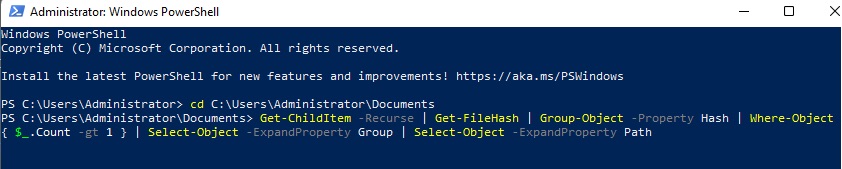
5. Hit Enter.
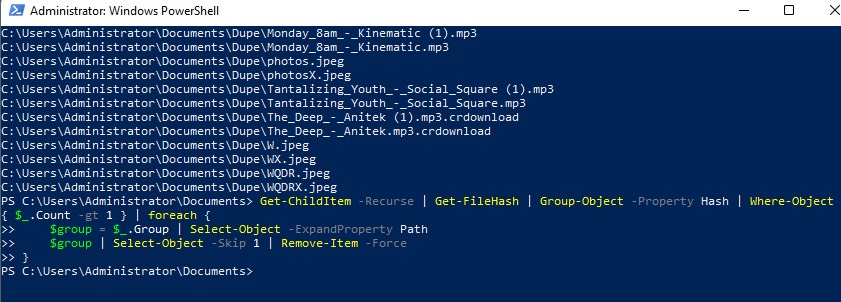
6. Then it will list all exact duplicate files with the same hash value in this folder. You can open these files in File Explorer according to the file location and delete them one by one manually after previewing. Alternatively, use the following command to automatically delete all duplicate files.
Get-ChildItem -Recurse | Get-FileHash | Group-Object -Property Hash | Where-Object { $_.Count -gt 1 } | foreach {
$group = $_.Group | Select-Object -ExpandProperty Path
$group | Select-Object -Skip 1 | Remove-Item -Force
}
Conclusion
Deleting duplicate files frees up local storage space for new files and makes it easier for you to find certain files. This article describes how to delete duplicate files in Windows 11 with different methods. Method 1 is suitable for most users. Whether you are a computer novice or a professional user. Both method 2 and method 3 allow you to remove duplicate files for free.

With a passion for tech and writing, Sarah joined Cisdem, where she focuses on creating articles about using utility tools to enhance file management and simplify contact management.

Adrian Li is Cisdem’s Chief Engineer and serves as the editorial advisor for Duplicate Finder and ContactsMate. His work and insights have been featured in leading tech publications such as Fossbytes, TUAW, Redmond Pie, SafetyDetectives, and BestForAndroid.