How to Burn DVD on Windows 10/11 with or without Software
 12.8K
12.8K
 1
1
As a wedding photographer, burning DVDs is something I often need to do many times. Few people know that it only takes 3 steps to burn a professional looking DVD and one can even burn disc on Windows without any software.
Here in this guide I will detail the exact steps to burn DVD on Windows 10 or Windows 11. I will also show you how to set menu, chapters and subtitles for DVD, and details on how to choose the right DVD disc before DVD burning.
Quickly jump to the methods we tested and recommend:
 Cisdem DVD Burner
Burn DVD on Windows in Simple Steps
- Burn video to any DVD types, like DVD disc, DVD folder and ISO file
- Support burning MP4, AVI, MOV, and other 200+ popular digital audio and video formats to DVD
- Can burn videos with high quality and fast DVD burning speed
- Provide many predesigned menu templates with themes inspired by different occasions
- Add external background image and music
- Choose title frames and menu buttons, add text and title labels to enhance the DVD
- Include versatile video editing features such as adding watermarks, adding chapters, trimming the video, etc.
- Intuitive interface and easy to use
- Compatible with Windows 10/11 and macOS system
 Free Download
  Free Download
What to Prepare to Burn DVD on Windows 10/11
Before burning DVD on Windows, you need to prepare 3 basic things:
1. Recordable DVD drive, internal or external
2. DVD burning program, especially if you need to burn a playable DVD
3. Blank DVDs from Verbatim, Ridata, Sony, etc.
There are several types of discs for DVD burning, and the two major ones are DVD-R and DVD-RW. They are not expensive and can be played in most DVD players. If your video is longer than 120 minutes, you may consider getting DVD+R DL or DVD-R DL, which is also well known as two layers DVD.
| DVD Type | Repeat recording support | Capacity | Comments |
|---|---|---|---|
| DVD+R and DVD-R | Record only once | 4.7GB | DVD-R has wider compatibility with older devices |
| DVD+RW and DVD-RW | Rewritten around 1000 times | 4.7GB | Likewise, DVD-RW has broader compatibility |
| DVD+R DL or DVD-R DL | Record just once | 8.5GB | DVD+R DL is good for storing large movies or videos. DVD-R DL is less common |
| DVD RAM | Rewritten approximately 100,000 times | 4.7GB | For business & organizations use and it’s more expensive |
How to Burn a Playable DVD on Windows 10/11 with Stylish Menu
This Method is for:
- Burn a playable DVD in a short time with simple steps.
- Create the DVD menu and title for easy navigation.
- Make some edits and add subtitles to the DVD.
- Preview your DVD before burning.
- Write several DVD copies at a time.
- Loop playing your DVD.
- Create ISO file from videos instead when you don’t have a DVD disc.
- Burn oversized videos to DVD in high quality.
Surely, Windows 10 and Windows 11 come with built-in DVD burning capability. But we know, most of the users want to burn a playable DVD. You don't want to spend hours burning a DVD and find out that it is failed to play on a DVD player. The best way to burn any video to playable DVD with fast speed is to use Cisdem DVD Burner. Below are the steps to burn DVD on Windows 10/11.
Step 1. Install Cisdem DVD Burner
Hit Download to get a free trial of this DVD Burner for Windows on your computer.
Step 2. Import videos to the software
Insert a blank and writable DVD onto your optical drive. Drag and drop all movie files that you want to burn to the Source interface.
At the bottom, you can choose TV standard (e.g. NTSC) and quality level (e.g. Fit to disc)

Step 3. Edit videos
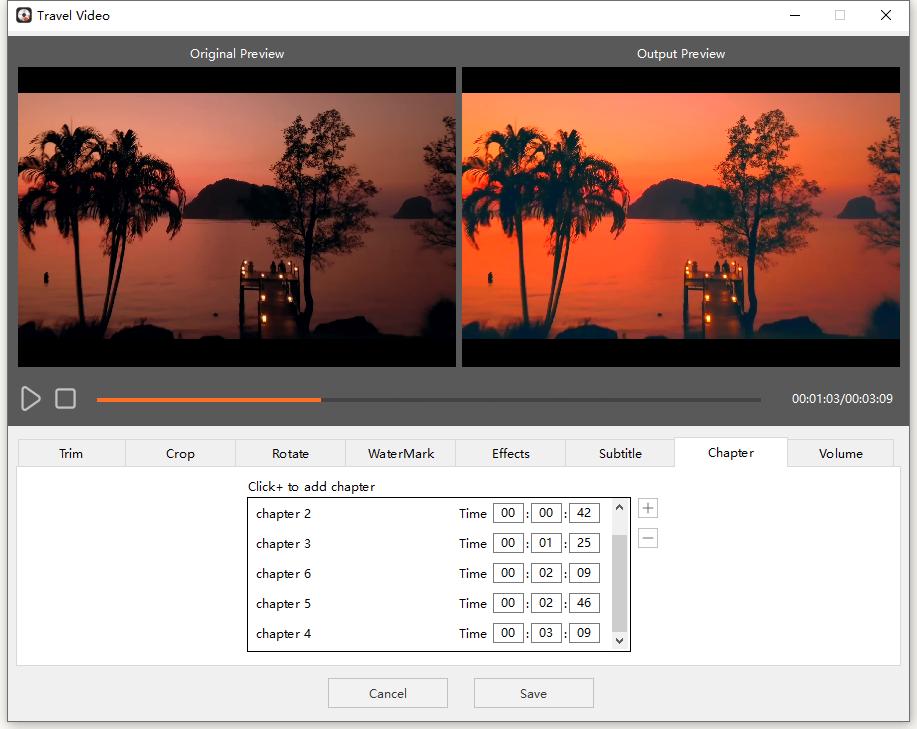
Click edit icon and you can modify the video with your needs on the popped-up windows. For example, you can trim extra segments of the video, adjust brightness effects, add external subtitle file, add chapters, etc.
Step 4. Create a unique DVD menu
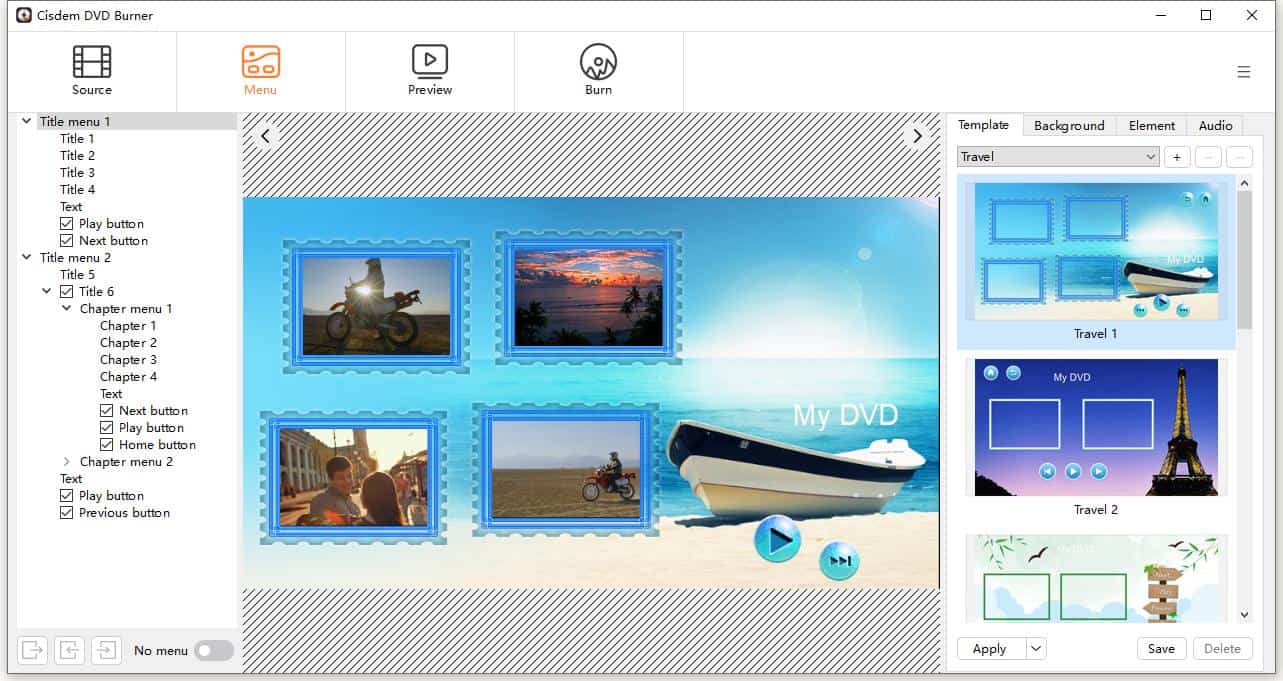
Click Menu icon to select your favorite DVD menu from the existing DVD menu templates displayed on the right pane. To create a special DVD, you can change the background image, import music, insert text, and change button/frame.
Or if you don’t need a DVD menu, you can tick out "No Menu" box on the lower left corner of the interface to ignore this step.
Step 5. Preview the DVD
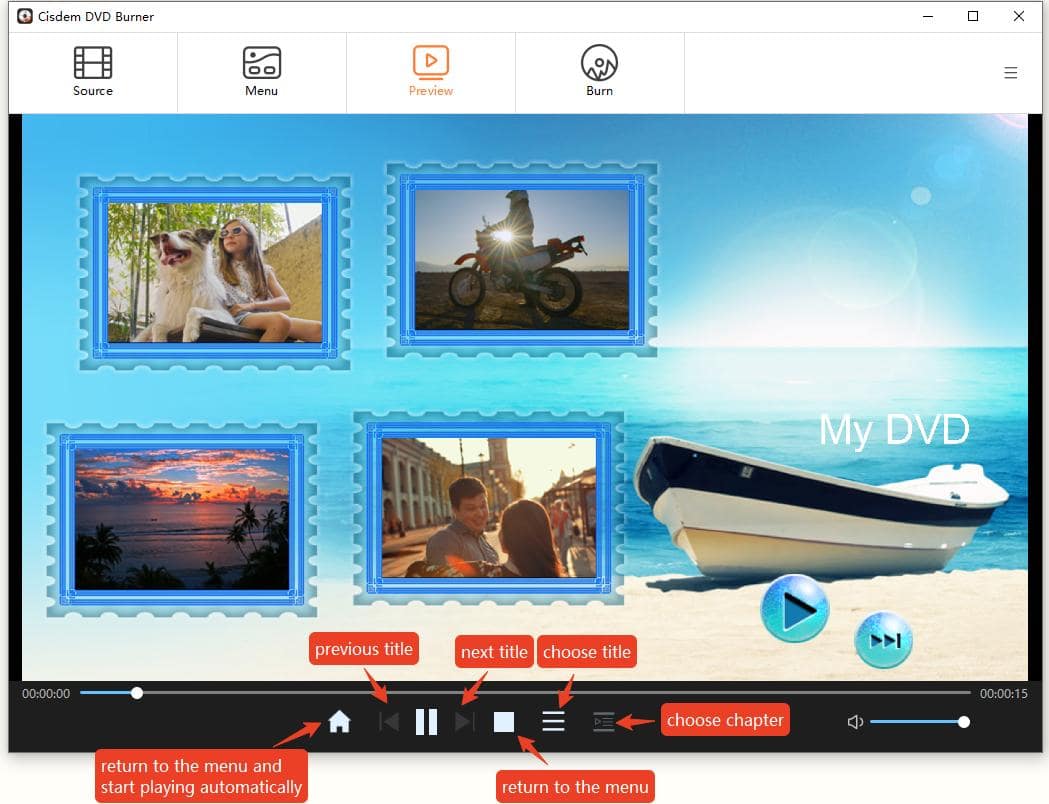
After all done, click Preview icon to load the final look of the DVD and watch the result. If you are unsatisfied about any part of the DVD, you can go back to the original place to reset them manually.
Step 6. Burn DVD in Windows 10/11
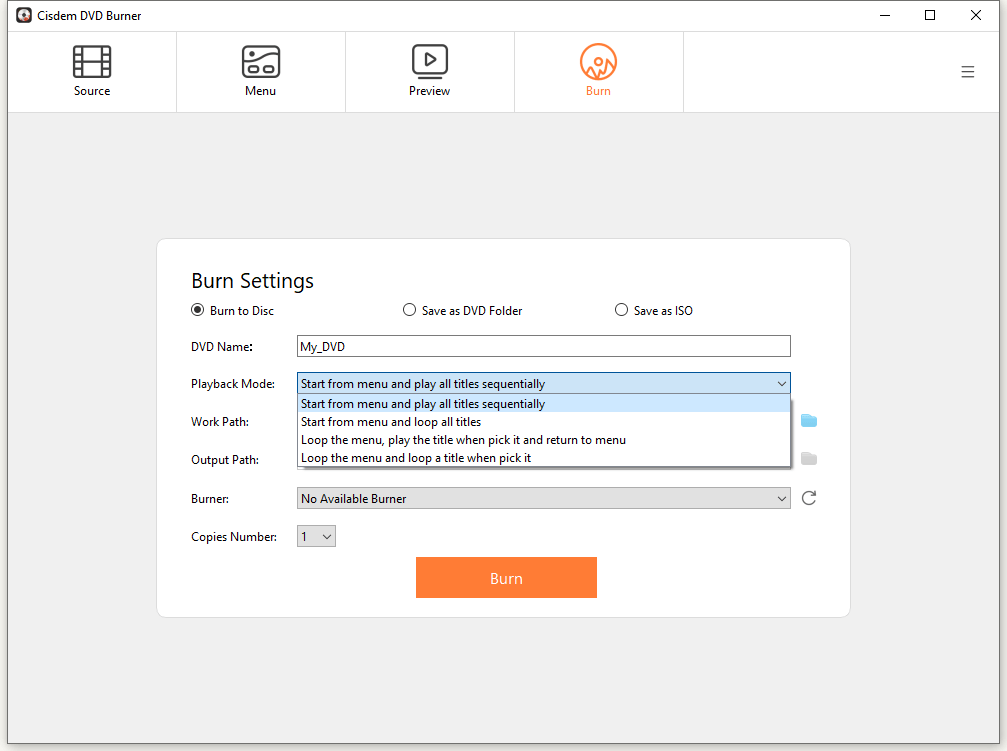
Finally, switch to Burn section, fill in the basic burning information in the corresponding places, including DVD type, playback mode, DVD name, storage pathway and copy number. Once done, click the “Burn” button.
How to Burn a DVD on Windows 10 via Freeware
This Method is for:
- Author a DVD by yourself without spending money.
- Create a DVD with a simple design.
- Burn videos in small size to DVD.
ImgBurn is a free DVD burning software for Windows 10/8/7/etc. It gains popularity due to wide support for OS versions, media file types, and disk image types. The app supports various file formats, including images, audio, and videos. Plus, it can be CD, HD DVD, and Blu-ray discs on all Windows systems. Every function is equipped with 5 modes: read, build, write, verify, and discovery.
Based on tests, a 1 GB video takes over an hour to write for ImgBurn, while the same video only takes 28 minutes for Cisdem DVD Burner. And it's not fit for beginners.
- Insert a blank DVD disc to your computer drive.
- Download and install the software. Open it on your Windows.
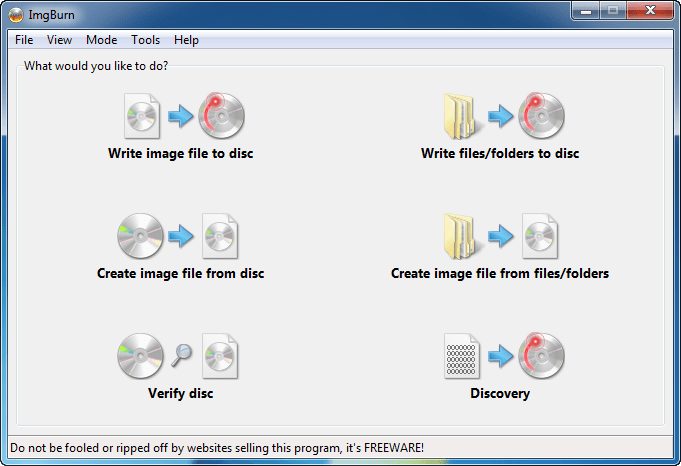
- Choose the “Write files/folders to disc” icon on the default interface. Then, it will show you the main interface to make DVD on Windows.
![imgburn default interface]()
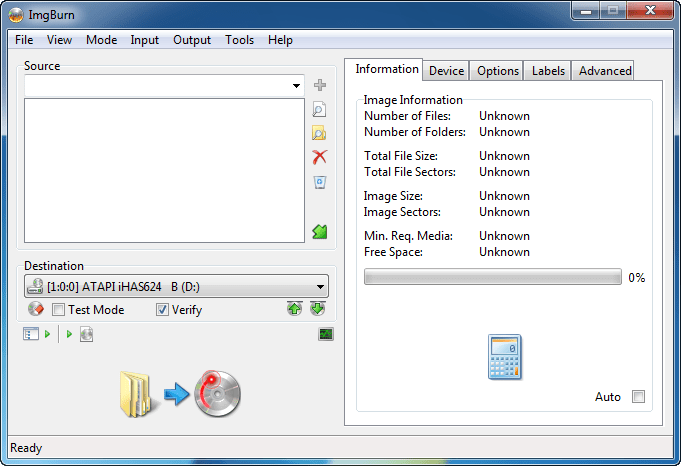
- Click the “Folder” icon on the “Source” section. Navigate to the files need to burn on your computer, select and upload them to the software.
- Then you can choose to click Information, Device, Options, Labels and Advanced buttons on the right part of the interface to set the depth setting according to your needs.
- When all is done, make sure to choose the DVD burner drive as the output pathway on the “Destination” box.
- Click the “Folder to disc” icon to burn a DVD on Windows 10/8/7.
![burn dvd on windows 10 via imgburn]()
How to Burn DVD in Windows 10 via Windows Media Player
This Method is for:
- Easily burn DVDs for data storage.
- Watch the DVD only on your computer.
- Burn MP3 files to audio and data CD.
As the name suggests, Windows Media Player is well known as a media player and media library on the Windows system. But now we will reveal another feature of it to burn data DVD on Windows.
It supports burning a large number of files up to 4.7 GB to a DVD 5 disc and 8.5 GB to a DVD 9 disc. It also allows you to burn many music files, pictures, and videos in JPEG, WMA, MP3, WMV, etc. formats.
- Insert a blank DVD disc onto the DVD drive of your computer and open Windows Media Player.
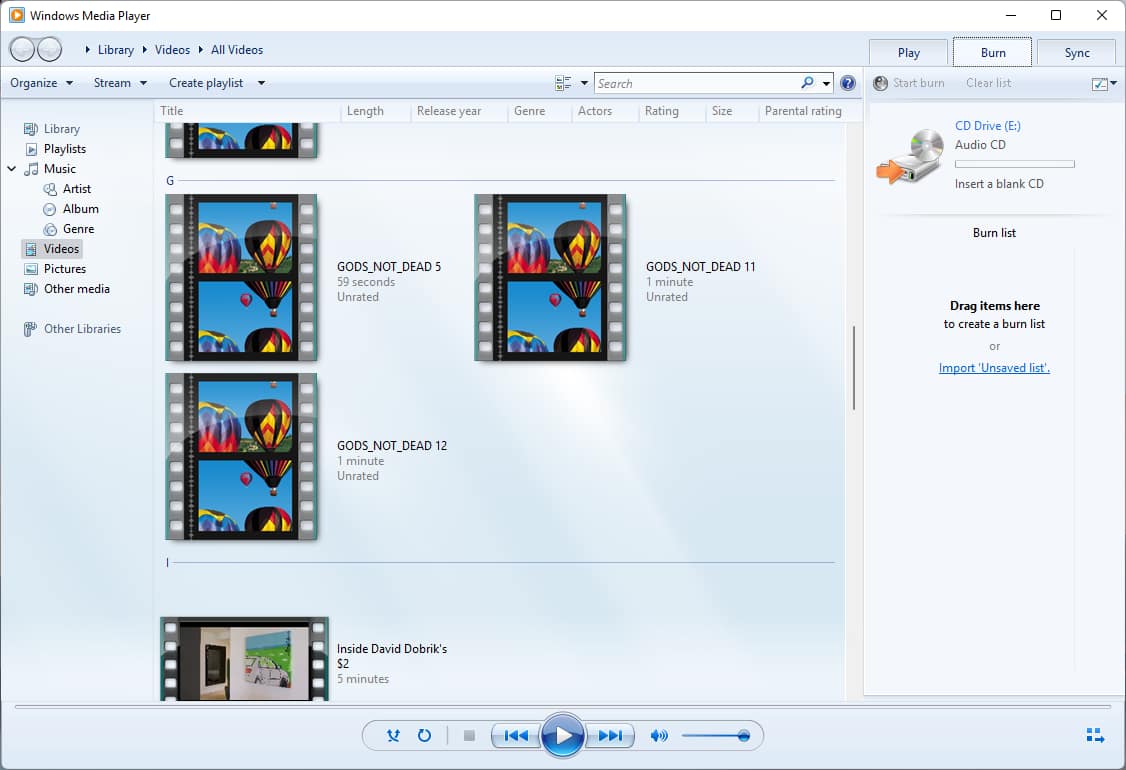
- Click “Burn” on the top right line of the interface.
![windows media player burning interface]()
- Drag and drop all video files to the "Burn list", and you are able to see the left capacity through the DVD disc video thumbnails.
- Hit the drop-down icon of the “Burn options icon”.
![click "burn option icon"]()
- Tick on "Data CD or DVD" on the popped-up list.

- After uploading all files, click the "Start burn" button to burn a DVD on Windows 10.
How to Burn DVD on Windows 10 Using File Explorer
This Method is for:
- Select the recording speed.
- Burn data DVDs for storage.
- Burn a DVD without installing new software.
When it comes to burning a DVD on Windows 10 without any software, File Explorer should help. Unlike other methods, Windows File Explorer asks you to choose how to use the disc. There are two options - “Like a USB flash drive” and “With a CD/DVD player”. See how they differ:
| Like a USB flash drive (Live File System) | With a CD/DVD player (Mastered) | |
|---|---|---|
| Supported DVD types | DVD±RW | Any recordable DVD |
| Compatible OS | Windows XP or above | Windows, Mac, old devices, etc. |
| Writing speed | Slower | Quicker |
| How it works | Delete or add new files based on the old ones just like USB, no need to erase | Write once or erase and then re-burn a DVD |
Steps to burn DVD on Windows by choosing “the “Like a USB flash drive” option:
- Insert a writable DVD into the computer drive, it will automatically pop up the “Burn a Disc” window.
- Give a name to your disc.
- Pick the first option - “Like a USB flash drive”. Then click “Next”.

- When finishing formatting the DVD, File Explorer window will open. Drag and drop files or folders to the DVD disc.

- Then you can choose to eject the disc at will, because Windows will make corresponding operations before ejecting out the disc.
Steps to write DVD on Windows by choosing “the “With a CD/DVD player” option:
- Once the “Burn a disc” window appears, click the radio button near “With a CD/DVD player”. Then hit the “Next” button.
- Add files to the target location. A prompt - "You have files waiting to be burned to disc" from Windows Explorer will pop up.
![add files to disc]()
- Press on “Drive Tools” in the top menu line and then click “Finish burning” option to activate the “Burn to Disc” Window.

- Choose the recording speed as 4x, 8x, or others.
![select recording speed]()
- When all is done, click “Next” to send all files to the disc for burning. And you can see the burning progress and duration. After finishing, the disc will drop out from the optical drive automatically.
How to Burn a DVD on Windows 10 with Command Prompt
This method is for:
- Burn ISO image to DVD quickly.
- Complete the burning task in Command Prompt.
- Users like to work with command lines.
If you already have an ISO file saved locally and just need to burn DVD on Windows without installing any software, try Command Prompt. It relies on the assistance of a Windows built-in and GUI-based tool called Windows Disc Image Burner.
But it only supports burning a DVD in Window 7 and above. And for users who are not familiar with command lines, it is recommended to use the DVD burning software, which is simpler to understand.
- On your Windows computer, click “Start” > type in "CMD" > select “Command Prompt” from the list.
- Type “isoburn” or “isoburn.exe” to access a syntax guide: ISOBURN.EXE [/Q] [<drive letter>:] <disk image file name>.

- Once you learn the usage, click “OK”.
- Type your syntax. For example: isoburn /q e: C:\Users\Administrator\Desktop\iso-image\My_DVD.iso.
“e:” refers to the actual drive letter of your optical drive.
“C:\Users\Administrator\Desktop\iso-image\My_DVD.iso” is the path to the ISO file.![burn iso to dvd command line]()
- Press “Enter” to fire up the Windows Disc Image Burner” utility, and wait for burning status to be finished.
![burn dvd windows command prompt]()
Comparison Between Methods for Burning DVD on Windows Above
| Use Cisdem DVD Burner | Use Freeware | Use File Explorer | Use Windows Media Player | Use Command Prompt | |
|---|---|---|---|---|---|
| Supported system | Windows and Mac | Windows | Windows | Windows | Windows |
| Supported formats | 200+ | 30+ | Most digital formats | 40+ | ISO |
| Recording speed | Fast | Slow to burn large video files | Normal | Normal | Fast |
| Burned quality | High | Normal | High | High | Normal |
| Output DVD type | Video DVD | Video DVD | Data DVD | Data DVD | Video DVD |
| Provide various DVD menu | √ | × | × | × | × |
| Offer built-in video editor | √ | × | × | × | × |
Cisdem DVD Burner is what we always use. It's good at creating a playable and nicelooking DVD. ImgBurn is another professional app, but it can't beautify DVD, and it is not suitable for newcomers. WMP and File Explorler are for users who want to make data DVDs. Command Prompt does well in burning ISO to DVD. Hope these 5 programs and methods do you a favor.
Data DVD vs video DVD
To burn a DVD you also need to choose an appropriate burning format. Most people are familiar with Video DVD, the DVD discs we rental or buy are all Video DVDs. It has a navigation menu. You can easily play it on a DVD player or TV. But if you burn a DVD with Window media player you'll get a Data DVD, which is really a storage medium similar to a USD or SD card, you can play data DVDs on a computer and re-edit data. However, it cannot be played on a DVD player.
After burning a video DVD, it won't play...
The disc requires handling
- Wipe and clean the disc with scratches or dust.
- If you burn to DVD+R or DVD+RW, the old DVD player may not recognize it, use DVD-R or DVD-RW instead.
- If the disc quality is too poor, it might skip or get all glitchy when you play it. You need to buy a disc from a well-known brand such as Verbatim.
DVD burning speed is too fast
Some DVD burning software requires manual setting of the burning speed. Try to choose a slower speed to reduce data errors. It is recommended to use 8x for DVD±R and 4x for DVD±RW.
Unsupported DVD format
Before burning a DVD on Windows, you need to set NTSC or PAL television standard. Users in North America, Japan, and South Korea choose NTSC, and users in Europe and Australia choose PAL. Even if you use set the wrong format, you have 5 chances to change it.
DVD burning is not complete
Insert the disc into the computer and check if the folder has the complete DVD structure: including VIDEO_TS (with .VOB, .IFO and .BUP files) and AUDIO_TS folders.
Invalid name
Keep disc names short and avoid special characters.
Extend: Burn a CD on Windows 10
How to burn CD in Windows 10 without any software or with it? ImgBurn, Windows Media Player, and File Explorer allow you to burn a CD. File Explorer can only burn data CDs, while the first two can burn both data CDs and audio CDs.
Data CD vs audio CD, what’s the difference:
| Data CD | Audio CD | |
|---|---|---|
| Used for | Music, video, and image | Music |
| Capacity | 700MB or 8 hours of music | Up to 80 minutes |
| Supported device | Some CD and DVD players | Almost all CD players |
That wraps up this guide. Whether you’re making DVD for gift giving, working, or for your own enjoyment, learning how to burn DVD on Windows 10/11 can make a huge difference.

Jenny is a technology editor who has been blogging since she was a student. Since joining Cisdem, she focuses on writing articles about video software and how-to guides. She loves exploring new tools and techniques.

JK Tam is the lead developer at Cisdem, bringing over two decades of hands-on experience in cross-platform software development to the editorial team. He is now the lead technical approver for all articles related to Data Recovery and DVD Burner.




heylaland
The ways your mentioned are really effective for me to burn DVD on my Windows computer. Thanks for your detailed information, allowing me to choose the way that suits me best.