MP4 is the most ubiquitous and familiar video format, knowing how to compress MP4 files is crucial for solving video sharing/uploading issues and optimizing storage space. In this article, you will learn how to compress your MP4 file to a smaller size to fits your specific needs.
To reduce the size of a MP4 file, you need to re-encode the video by reducing the bitrate or resolution, or encoding with a more compressed codec such as H.265 or AV1 for MP4 container.
Determine your purpose for compressing, whether it's for web streaming, email attachments, or simply to reduce storage space. If you need to reduce the MP4 file size significantly, use a compression software like Cisdem and HandBrake that offer various compression options. You can check out our compression results of an MP4 1080P H.264 movie file to find the best approach that suits your requirements.
Compressing an MP4 or any other video file can be tricky sometimes unless you have a degree in video & audio encoding - How much can the MP4 be compressed without sacrificing quality? What image quality will I get? That's why I strongly recommend using a dedicated MP4 compressor to get rid of these problems.
Cisdem Video Compressor is a professional yet easy-to-use software designed for compressing media files while retaining original quality, available for Windows and Mac. It allows you to compress MP4 files effortlessly by setting a compression percentage and displaying the estimated output size. Also, you can customize video parameters including codec, resolution and FPS (frame per second) to further optimize the compression.
Step 1. Download Cisdem Video Compressor and install it.
 Free Download Windows 11/10/8/7
 Free Download macOS 10.13 or later
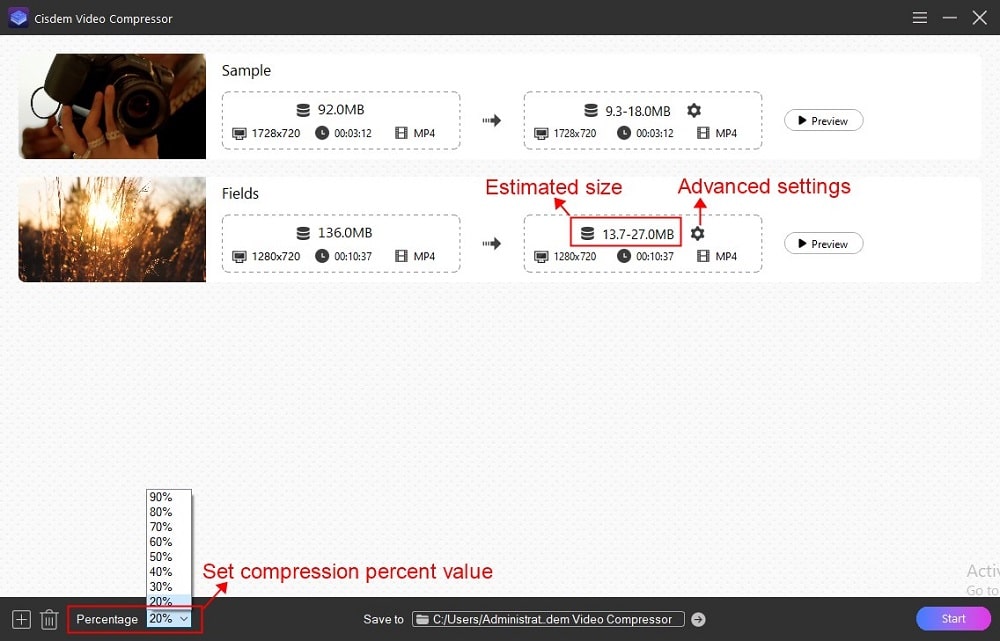
Step 2. Launch the software, and drag the MP4 file into the main interface.
Step 3. Set up compression methods. Use one or a combination of the following strategies.
Option 1: Compress MP4 by specifying a file size (percentage)
Move to the Percentage drop-down list on the left button to select a compression percent value from 90% to 20%, smaller value means smaller file size. The app will reduce the video bitrate based on the settings.
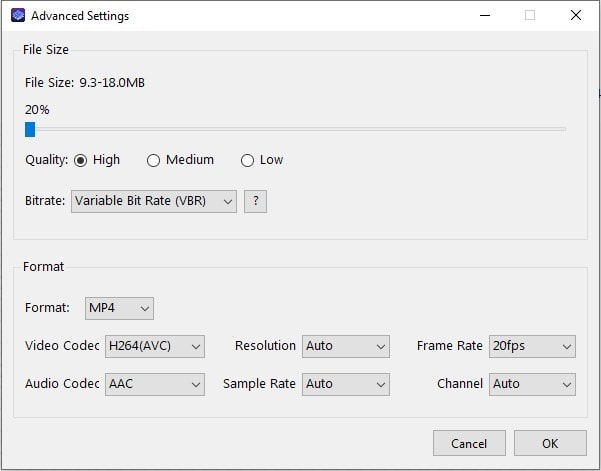
Option 2: Compress MP4 video by adjusting format parameters
Click the gearwheel icon to open a new window of optional settings. Go to the "Format" section and switch the video codec to H.265 or AV1. Choose a lower resolution and frame rate can also help reduce the size, but may impact the visual integrity. Click "OK" to save the changes.
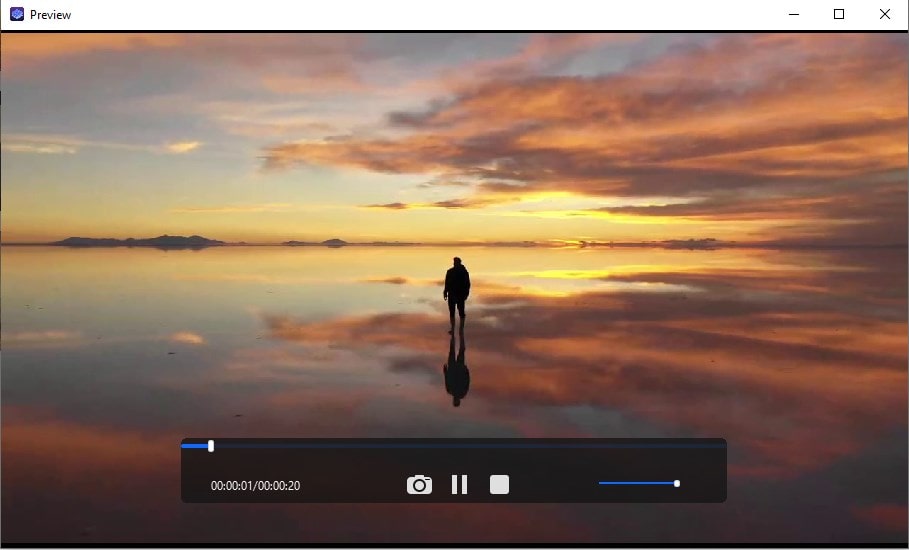
Step 4. Click the Preview button on the main window to see how the MP4 file would look like after compression.
Step 5. If satisfied, choose an output location and click the "Start"![]() button to begin compressing the MP4 file.
button to begin compressing the MP4 file.
| Initial Size | Compression Method | Outut Size | Compress Duration |
|---|---|---|---|
| 715 MB | Target 20% | 143 MB | 15 minutes |
| Transcode to HEVC (h.265) | 522 MB | 24 minutes |
Free Download Windows 11/10/8/7Free Download macOS 10.13 or later
HandBrake is a popular video transcoder that lets you compress MP4 files by lowering video resolution, codec, constant quality value, frame rate and more factors. Since it cannot display the output file size before compress, you may need to do some experiment to find the best settings for you.
Steps to compress an MP4 file with HandBrake on Windows or Mac:
1. Download HandBrake from its official website.
2. Launch HandBrake and import an MP4 file.
3. Select compression options.
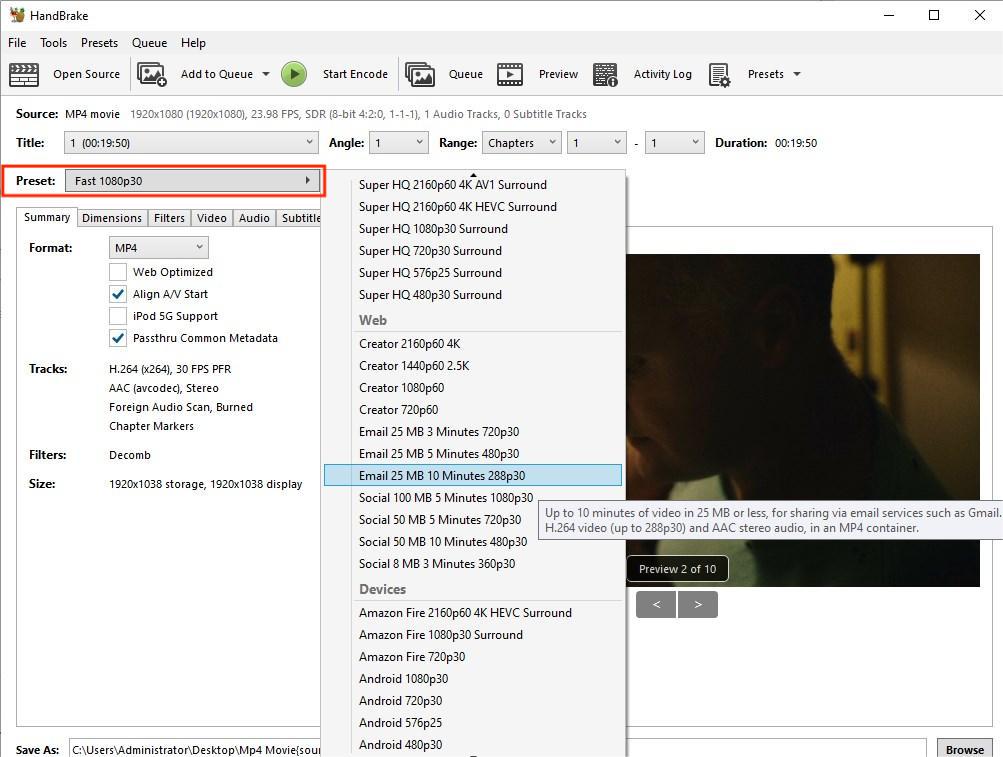
Option 1: Compress MP4 by selecting a preset.
Click the Preset list and select an output option that might suits your need. For example, assuming your MP4 file is up to 10 minutes long and you intend to compress it for email, choose "Email 25 MB 10 Minutes 288p" option.
Option 2: Compress MP4 by customizing one or multiple parameters.
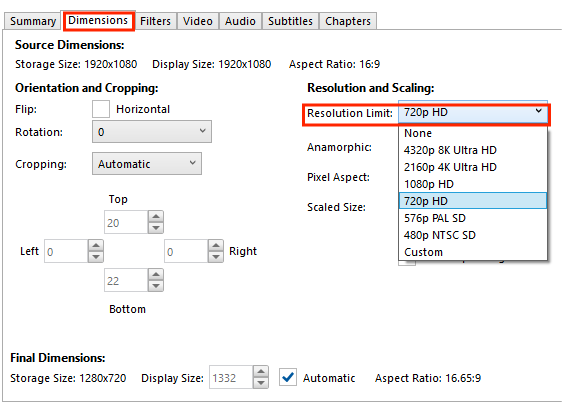
In the Dimensions tab, select a resolution limit lower than the source file.
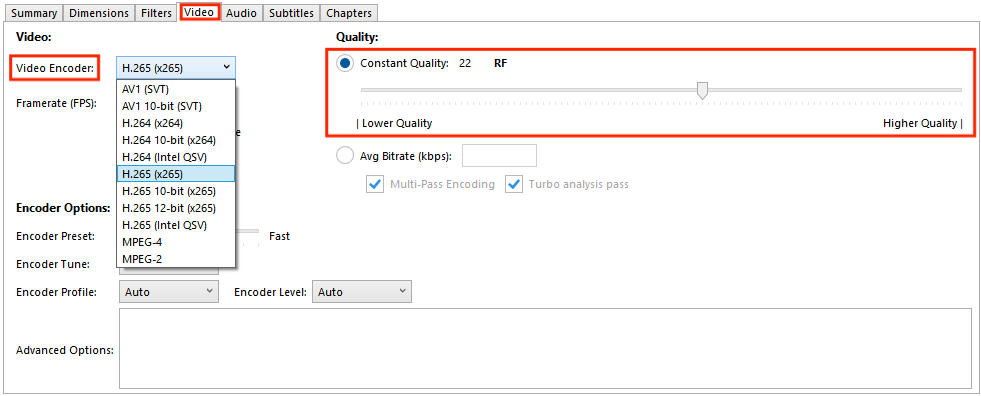
Go to the “Video” tab and choose H.265 or AV1 from the Video Encoder list. You can also adjust the Constant Quality slider toward the left to reduce video quality and make the file even smaller. Hover your mouse pointer over it for a detailed explanation.
If necessary, go to the Audio tab to lower the audio bitrate or remove the audio track. Not much effect on the file size though.
4. Click "Start Encode" or "Start" on the top to begin compressing the MP4 file.
| Initial Size | Compression Method | Outut Size | Compress Duration |
|---|---|---|---|
| 715 MB | Resize from 1080p to 720p | 285 MB | 23 minutes |
| Transcode to H.265 | 343 MB | 90 minutes |
Did you know that you can compress video using PowerPoint? It’s quick and convenient, compressing large MP4 file by reducing the resolution. Although it lacks customizable options, it’s worth a try if you already have the program installed on your PC or Mac.
1. Open Microsoft PowerPoint and create a new presentation.
2. Select Insert > Video > This Device to insert an MP4 video.
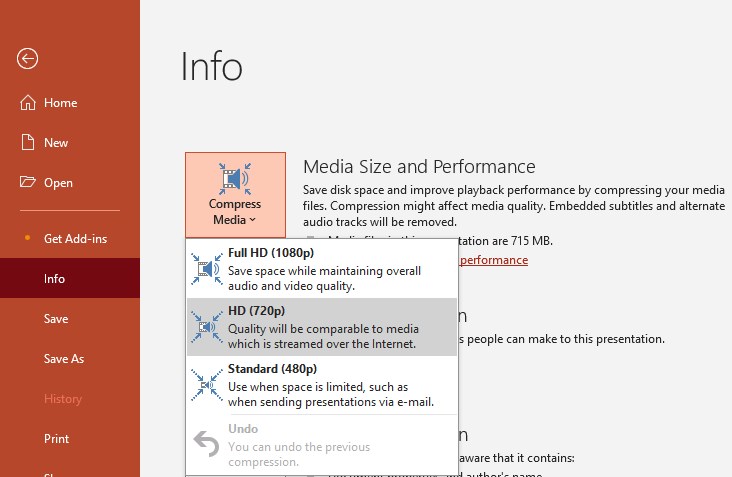
3. After the MP4 file has been inserted and appears on the slide, click the “File” tab, select “Info”.
4. Click Compress Media in the Media Size and Performance section, and select a compression method from the menu - 1080p, 720p or 480p.
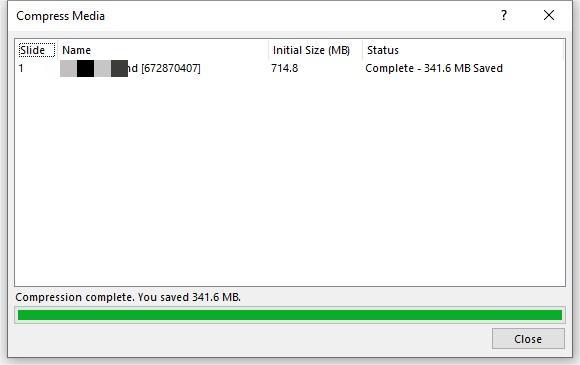
5. Then a Compress Media window will pop up and begin the compression process. When it complete, you can check the compressed file size.
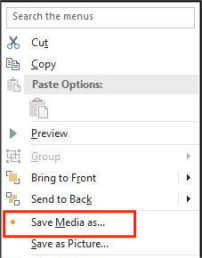
6. To save the compressed MP4 file, go back to the slide, right click on the video and choose “Save Media as”.
| Initial Size | Compression Method | Output Size | Compress Duration |
|---|---|---|---|
| 715 MB | Choose HD (720p) | 373 MB | 17 minutes |
Online tools are easy to access but usually have upload size limits or even video length limits. After trying dozens of online MP4 compressors, Veed stands out for fewer restrictions and fast compression.
1. Visit https://www.veed.io/tools/video-compressor site, and click “Compress a video”.
2. Upload your MP4 file to the site, it may take some time.
3. Choose compression settings in the Compress Your Video panel. It’s recommended to set the quality level as Medium or lower.
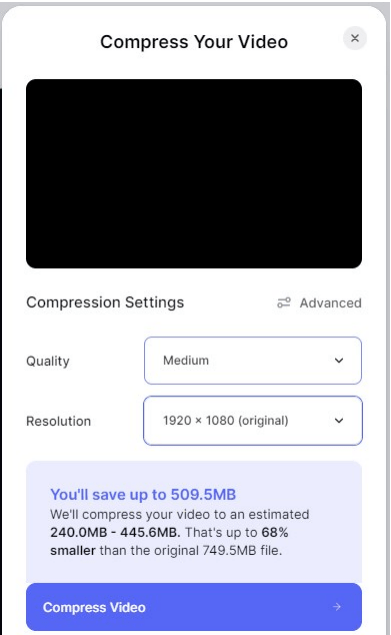
4. Click Compress Video to start compressing the MP4 file online.
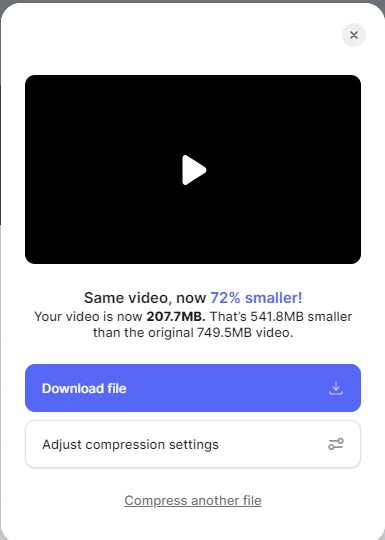
5. When complete, it will show you the compressed file size. If satisfied, click "Download file" to save it to your device. Otherwise, click "Adjust compression settings" to compress it again.
| Initial Size | Compression Method | Output Size | Upload + Compress Duration |
|---|---|---|---|
| 715 MB | Medium quality | 207 MB | 10 minutes |
This method is recommended for people who prefer native programs and don't want to use any third-party tools. Note that these native programs only support compressing MP4 videos that are encoded with specific codecs, such as H.264 and MPEG-4.
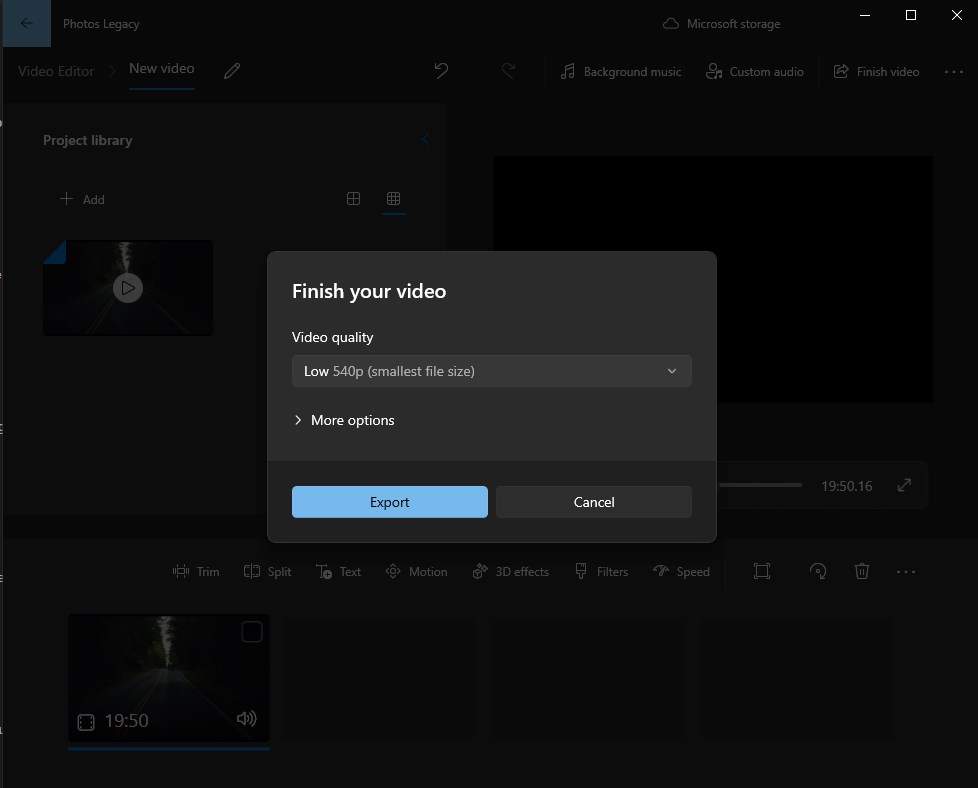
Video editing software usually allows you to compress MP4 files with its Export settings, as does Microsoft Photos Legacy, which comes preinstalled on Windows 10 and before. Users running on Windows 11 can get it from Microsoft Store for free.
| Initial Size | Compression Method | Output Size | Compress Duration |
|---|---|---|---|
| 715 MB | Medium (720p) | 516 MB | 14 minutes |
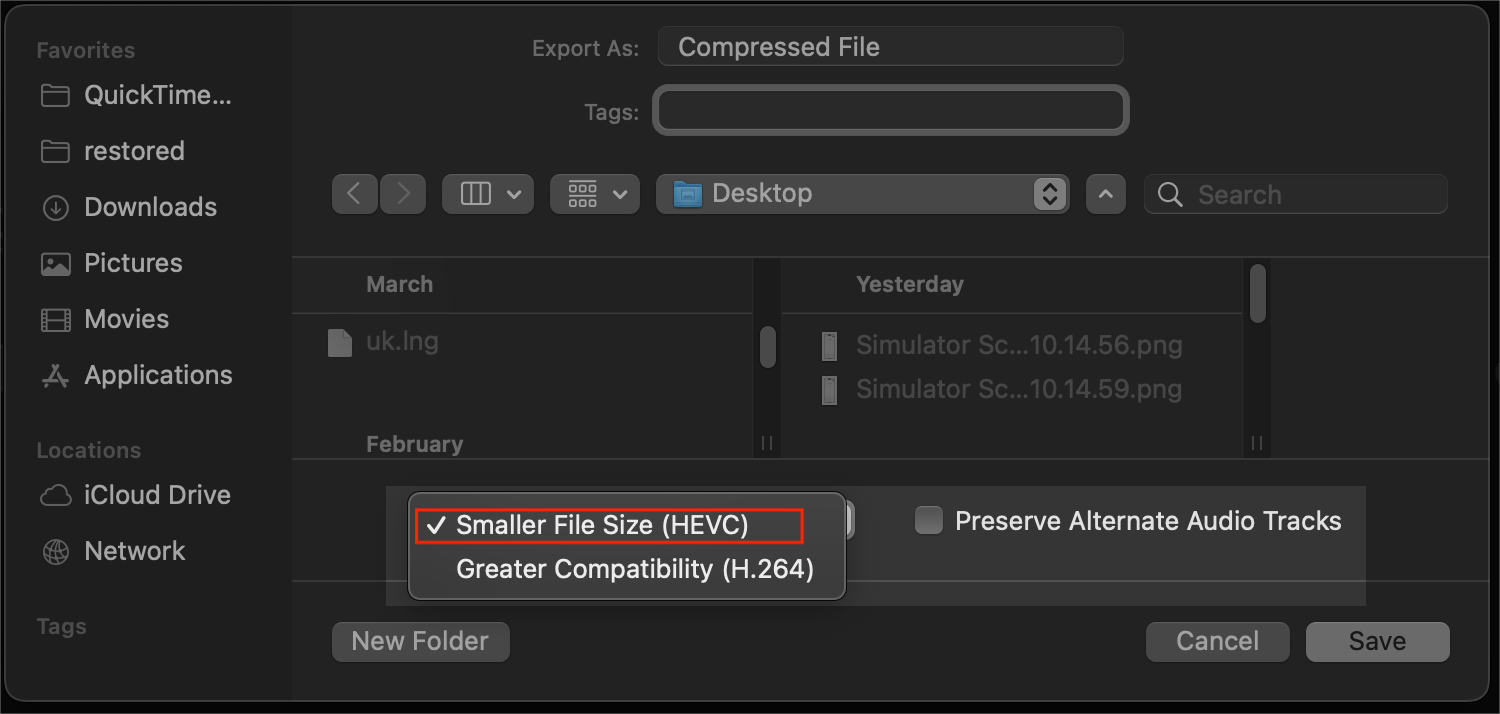
QuickTime Player is the default video player that comes with all Mac computers, capable of exporting MP4 videos to different quality levels to reduce the MP4 file size.
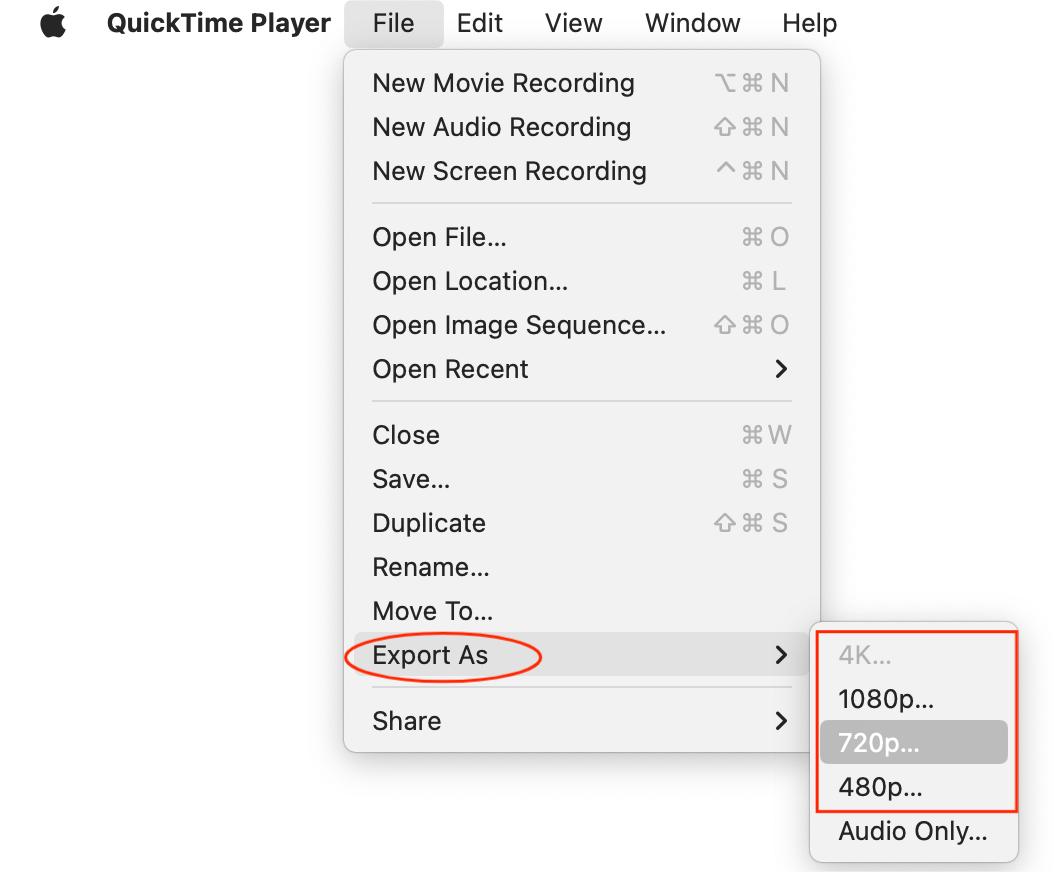
Tip: If you select the 1080p or higher export resolution, it will let you select an output format in the export window. Choose “Smaller File Size (HEVC)” for higher compression.
| Initial Size | Compression Method | Output Size | Compress Duration |
|---|---|---|---|
| 715 MB | Export as 720p | 590 MB | 5 minutes |
By employing the 5 methods outlined above, you can effectively compress your MP4 videos regardless of your technical skills.
Which tool to use depends on the specific MP4 file type, compression purpose and playback scenarios. According to my test results, a dedicated MP4 compressor like Cisdem should meet most needs and provide you more control over the output file size and quality.

Jenny is a technology editor who has been blogging since she was a student. Since joining Cisdem, she focuses on writing articles about video software and how-to guides. She loves exploring new tools and techniques.