
How to Fix Hosts File Not Blocking Websites on Windows 10
 436
436
 0
0


Using hosts file is a good way to block websites on Windows 10. Unlike some other methods, editing the hosts file blocks a website across all browsers on your computer. And it remains effective even if you restart your computer. However, many users have reported that the hosts file method not working on blocking websites on their Windows PC. This article tells you 6 common solutions and the best way to fix this.
 Cisdem AppCrypt
The Best Websites Blocker for Windows PC
- Block websites on Chrome, Edge, Firefox and more browsers
- Let you block specific sites and pages, URLs with certain words, and categories of sites
- Let you block all websites except specified ones
- Lock individual apps with password
- Let you block websites and lock apps permanently or at scheduled times
- Easy to use
- Hard to bypass
- Help with productivity, parental controls, and privacy protection
- Available for Windows, Mac, Android and iPhone


6 common ways to fix hosts file not blocking websites on windows 10
Here are 6 common ways to fix the issue of hosts file not blocking websites.
Way 1: Verify the hosts file you edited
The process of blocking websites using hosts file on Windows 10 is a bit cumbersome. Therefore, many users, especially those who are not tech-savvy, might make a mistake in certain step and then the hosts file fails to block websites. So the first you need to do is verifying the hosts file you edited is correct.
Now I show you the detailed steps to block a website using hosts file on Windows 10, you can verify if you do the same:
Step 1: Click the Windows icon on computer. Search for Notepad. Select Run as administrator.

Step 2. Open Notepad. Click File > Open. Open your C Drive. Navigate to Windows > System32 > drivers > etc > hosts.
Step 3. Select All Files from the File Type drop-down menu. Find and open the hosts file.

Step 4. Go to the bottom of the hosts file. Add a new line. Enter:
127.0.0.1 example.com
127.0.0.1 www.example.com
Replace example.com with the website you wish to block.
Step 5. Click File > Save. Close Notepad.
The error-prone steps:
1. Remember to open Notepad as an administrator, otherwise you will not have permission to edit the hosts file.
2. Remember to select "All Files" in "File Type" menu, otherwise you may not be able to find the hosts file.
3. Use a single space to separate the IP address (127.0.0.1) and domain name (google.com) in step 4. Do not use multiple spaces.
4. Add entries for both example.com and www.example.com. Many websites use both versions of their domain.
After verifying that the hosts file you edited is correct, if it still not blocking websites, check for other fixes below.
Way 2: Check hosts file permissions
If hosts file still not blocking website on your Windows 10, it may be because you do not have permission to modify the hosts file. You can check the hosts file permissions in Windows by following the steps below:
First,open File Explorer. Open C drive. Go to Windows > System32 > drivers > etc > hosts. If you can’t find it, use the search function in the upper right corner. Then right-click on the “hosts” file. Select “Properties” from the drop-down menu. Go to the “General” tab, find the Attribute section at the bottom. Uncheck the box next to "Read-only" if it is checked. Go to the “Security” tab. Select a user in the box of “Group or user names”, here you can select the user that you want the hosts file blocking applies to. Click the “Edit” button. Allow “Full Control” and “Edit” permissions. Finally, click on Apply > OK to save the changes.

After changing the hosts file permissions, you can try to access the blocked website to see if the blocking is successful.
Way 3: Clear browser caches
Browser caches contains records of your previously visited domain names. It can speed up websites loading times, reduce network traffic, etc., but it is also possible to make your changes in hosts file ineffective. If hosts file not blocking websites on a browser, you can clear the browser’s cache. Below are steps to clear catches in different browsers on Windows 10.
For Google Chrome
First Open the browser. Click the 3-dot icon in the upper-right corner. Go to Settings > Privacy and security > Deleting browsing data.

In the pop-up window, select “All time” as the time range, check the box next to “Cached images and files” and “Cookies and other site data”. Then click the “Delete data” button.
For Microsoft Edge
Open the Edge browser on your Windows computer. Click the 3-dot icon. Then select “Cookies and site permissions” in the “Settings” menu. Click on “See all cookies and site data”. Click “Remove all” in the pop-up window. Then click the “Clear” button.
The steps to clear caches in other browsers such as Firefox, Opera are similar. You can usually find the feature in the Settings menu. After clearing browser caches, check if the issue of host file not blocking websites windows 10 issue is resolved.
Way 4: Flush DNS caches
If none of the above ways worked, there’s another thing you can try: flush DNS caches, which will clear all stored DNS records in your system and force it to retrieve fresh data from the DNS server the next time you visit a website.
Open the Start menu on Windows. Search for “Command Prompt”. Select “Run as Administrator”.

In the Command Prompt window, type ipconfig /flushdns. Then press Enter.

That’s it. The DNS caches on your computer will be cleared, which should fix the hosts file not blocking websites issue.
Way 5: Turn off proxy or VPN
The proxy and VPN will bypass the DNS resolution on local, which may make the host file not blocking websites. So, if you want to block websites using hosts file, the necessary step is to turn off proxy and VPN on your computer.
To check the VPN connection, you can open the Start menu on Windows. Open Settings > Network & internet > VPN to see if it shows Connected.

Way 6: Quit antivirus software
If you installed antivirus software on your computer, it may prevent you from modifying hosts file, or directly ignore it. To avoid this, you should quit the antivirus software to see if the blocking works.
Hosts file still not working on blocking website? Try this
Using hosts file, you are able to block websites on your Windows 10 for free. However, it comes with some limitations:
1. The setup process is a bit cumbersome. It requires you to add entries one by one for each website you want to block. This can be cumbersome, especially if you have many websites to block.
2. Some users have reported that the hosts file doesn’t work on Chrome browser.
3. Sometimes it fails to block certain websites. These websites may be able to bypass the hosts file restrictions.
4. It’s not flexible enough. For example, it do not support blocking a site only during specific hours or days.
If hosts file still not blocking websites after you tried above 6 fixes, or it can’t meet your needs, try Cisdem AppCrypt - the best website blocker for Windows PC.
This tool is suitable for non tech-savvy users. It’s easy to use yet powerful. With it, you can easily block tons of bad websites (such as Social media, Games sites, Porn sites) by category. You can also manually add specific websites/pages to block. By default, the blocking is permanent. You can also set it to block sites at certain times. Here are how to use this hosts file alternative to block websites on Windows 10:
Step 1: Download and install Cisdem AppCrypt.
 Free Download Windows 10 or later
Step 2: Launch it. Set a password in the prompt window.

Step 3: Open its main window by clicking the lock icon on the task bar. Enter the password. Click OK.

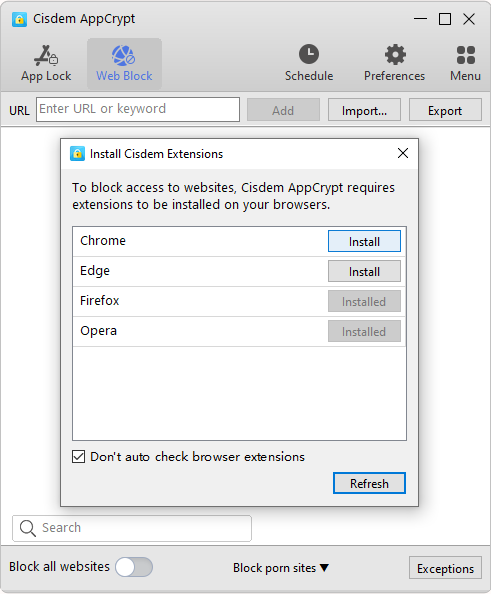
Step 4: Now you are in the main window. Go to the “Web Block” tab. A window will pop up asking you to install extensions for different browsers, including Chrome, Edge, Firefox, Opera, and Brave. Click “Install” to add extensions to your browsers.
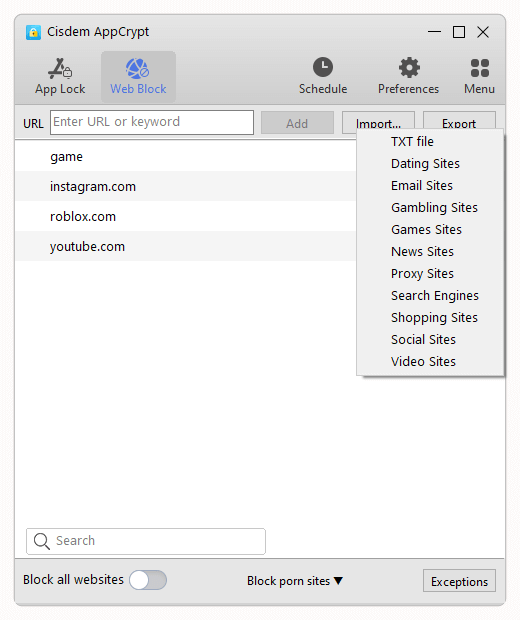
Step 5: Go back to the “Web Block” tab, enter the domain name of the website you wish to block into the top URL field. Click “Add”. Or, you can use the “Import” button to block sites by category.
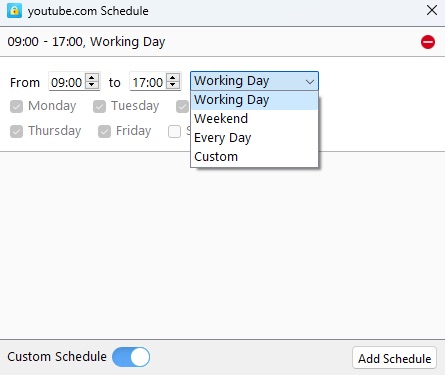
Now the websites are blocked on your Windows PC permanently. By selecting a website under the “Web Block” tab and clicking on the clock icon that appears, you can set the time you wish the site to be blocked, like working hours.
This hosts file alternative offers 3 options to unblock websites: Disable Web Block, Quit, or Remove the site from the block list. Each option requires entering the correct password.

Conclusion
Many issues can cause hosts file not blocking websites on Windows 10. Above are 6 ways to fix the problem. Hopefully, one of them helps you. You can also use the website blocker tool I introduced to blocking sites on your Windows more effectively. Meanwhile, if you have any doubts, let me know in the comments.

Norah Hayes likes to share her tips on how to improve focus and stay motivated at work. She believes it is essential to eliminate all online distractions during work hours.

Ethan Long joined Cisdem in 2015 as a developer and now serves as the editorial advisor for Cisdem AppCrypt. He actively tests and uses Cisdem AppCrypt and other screen-time management tools to ensure AppCrypt meets its promises in real-world scenarios.