6 Ways to Repair Windows 10 or 11 Using Command Prompt (2025)
 8.9K
8.9K
 0
0
Repairing Windows 10 or 11 with command prompt can be quite easy for IT professionals, but if you are not tech-savvy and all your attempts to repair the Windows yield no results, you can also use command prompt to fix the issue. In this article, we will discuss what is command prompt and how to initiate it, also explore the steps to repair Windows 10/11 using command prompt under different situations.
 Cisdem Data Recovery
Lost Data on Windows? Recover from Factory Reset, Crashed or Problematic PC
- Restore files lost under different cases: factory reset, clean install, reinstallation, system crash, corrupted drive, power off, Windows update or downgrade, bad sector, formatting, etc.
- Recover 1000+ files: video, audio, photo, document, email, archive, etc.
- Restore from internal and external storage devices
- Support NAS recovery
- Repair damaged videos and photos, even Office documents
- Recover files from specified folder or location
- Preview files before recovery
- Quick scanning and recovering
- Highly compatible with Windows 11 and earlier
 Free Download Windows 11/10/8/7
What is Command Prompt on Windows and How to Open It?
Command Prompt is a Windows utility to interact with PC and accomplish a lot of tasks. It is text based, users can enter command lines to conduct activities like opening/deleting/locating a file, creating a folder, batch processing files, repairing a disk, troubleshooting PC and so on. In some cases, it performs tasks faster and easier than using a GUI tool, but users should have a knowledge base about its general syntax, path and use the arrows to scroll through the commands.
Any Windows user can access to this Command Prompt tool using different methods, but there are 2 conditions, open Command Prompt when your Windows can boot properly or cannot boot.
In the case that your PC can boot, the easiest way to open Command Prompt for a common user is to find the app in Windows search box.

In the case that your PC won’t boot and keeps loading, you can boot your Windows into Automatic Repair and open the Command Prompt from there:
- Turn on and off your PC for at least 3 times, when your Windows detects the startup issue, it will direct you to the Automatic Repair screen.
- Then choose Advanced options > Troubleshoot.
- Select Advanced options > Command Prompt.
![open command when not boot]()
6 Ways to Repair Windows 10 or 11 Using Command Prompt
Now that we have known how to access Command Prompt when we can boot or cannot boot the PC, we will learn how to repair Windows 10 or 11 using command prompt in this part. There are 6 ways to do this, from easy to complex, serving for the same purpose of making your Windows run normally like before.
#1 SFC
SFC, with full name System File Checker, it is a built-in tool designed to scan Windows and restore the files by replacing damaged system files with a cached copy. This command prompt is used when your Windows doesn’t function properly or crashes. After entering this command line, the scanning will start. It may automatically repair the files while scanning or display the results after the verification process.
- Open Command Prompt from the search box of Windows taskbar. Or access from Automatic Repair screen according to part 1.
- Type "sfc /scannow" and press ENTER.
![sfc command 02]()
- Wait for the verification to complete.
![sfc command 03]()
- Check the results to see if it has automatically repaired your Windows PC or need manual actions.
#2 DISM
If SFC won’t repair your PC, it may be for the reason that it cannot repair the damaged files in local image, this is where DISM comes in. DISM, with full name Deployment Image Serving and Management, is a tool designed to modify, scan and repair system images. If damaged system images are the trouble stopping your PC work normally, DISM can help you fix the issue. It has 3 features, including CheckHealth which can detect any corruption inside a system image but cannot repair, ScanHealth which can scan more deeply to find damaged images, and RestoreHealth which can scan and repair the system image files in an automatic way.
So, here we will use the RestoreHealth option from DISM to scan and repair a Windows 10 or 11.
- Open Command Prompt according to the steps in part 1.
- Type "DISM /Online /Cleanup-Image /RestoreHealth" and press Enter.
![dism command 01]()
- Wait for the scanning and repairing to complete.
![dism command 02]()
On my PC, RestoreHealth repaired Windows successfully, if in your case DISM connects you to the Windows update server after the operation, you need to download the images online and then replace those damaged ones.

#3 RSTURI
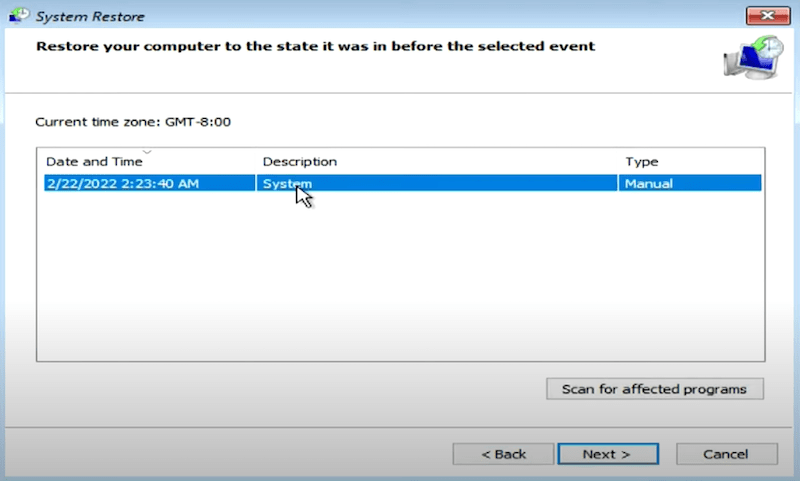
Or you can repair your Windows by reverting the system to a previous point with rstrui prompt. Rstrui.exe is the executable file of System Restore that located in C: Windows\System32. Whenever your Windows runs into a major and severe problem and want to fix, System Restore may be the ultimate tool.
But you should know that restoring system will get your system back to a state that you select and miss some data you didn’t backup in that restore point.
- Open Command Prompt accroding to the steps in part 1.
- Type "rstrui.exe". Press Enter.
![rstrui command 01]()
- Click Next to enter System Restore.
![rstrui command 02]()
- Then choose a restore point.
![rstrui command 03]()
- Once ready, click Finish and check if your Windows is repaired.
#4 BOOTREC
If your Windows won’t boot and you cannot repair it using the Startup Repair tools, you can also use BOOTREC commands to fix the issue manually. It is the command options available in Windows Recovery Environment to solve system boot errors. .
It has 4 options:
/FixMbr: it writes Windows-compatible MBR to the system partition if MBR corruption is the reason makes you Windows behavior weirdly.
/FixBoot: it writes a new boot sector to the system partition if damaged boot sector is the reason stops your PC work normally.
/ScanOs: it scans all disks for installations and displays the entries that are not in the boot configuration store, if you find some installations are missing from the Boot Manager.
/RebuildBcd: it scans all disks for installations and add the installations you select to the boot configuration store, if you want to rebuild the boot configuration store.
- Open Command Prompt according to the steps listed in Part 1 when your Windows won’t boot.
- Type "bootrec /fixmbr" and hit Enter.
![bootrec]()
- If this won’t work, try other 3 options by typing "bootrec /fixboot", "bootrec /scanos", "bootrec /rebuildbcd".
- Restart your PC and check if the problem insist.
#5 SYSTEMRESET
Factory resetting Windows 10 or 11 is also an option to repair a PC when you’ve done a lot of attempts but still failed. This process will fix known and unknown system issues, delete corrupted system file, remove files or programs that conflicts with the system, also free up space to enhance the overall performance. There are 2 options for factory restting: keep personal files and remove everything, you can choose according to your needs.
- Open Command Prompt.
- Type "systemreset" and press Enter.
![systemreset01]()
- Choose a factory resetting option.
![systemreset 02]()
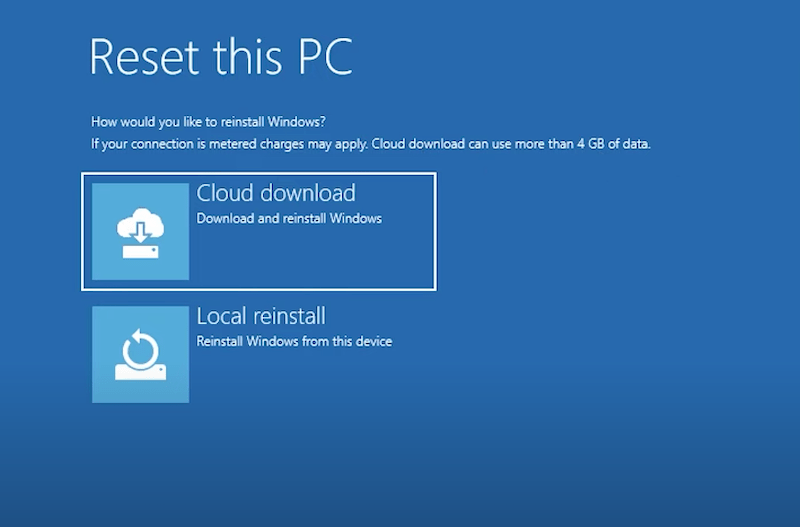
- Choose a way to reinstall Windows.
![systemreset 03]()
- Confirm to reset your Windows 10 or 11, after this, check if the problem has been fixed once the PC restarts.
#6 DISKPART and COPY
In the case none of above methods is repairing your Windows, you should think about having a clean installation for Windows from a bootable USB drive. A clean install will only install the Windows on your PC, there is no pre-installed app. First, you should get a USB drive ready and format it for clean Windows installation.
- Connect the USB drive to your PC.
- Open Command Prompt, type "diskpart" and press Enter.
![diskpart01]()
- Type "list disk" and press Enter.
![diskpart02]()
- Select your USB drive.
- Type "clean" and press Enter to format the USB drive.
- Relaunch Command Prompt to exit Diskpart.
- Type "X:", X is the drive letter of the drive where you mount the Windows ISO image.
- Type "cd boot" and press Enter.
- Type "bootsect /nt60 Y", Y s the drive letter of the bootable USB drive.
- Type "xcopy X:\*.*Y:\ /E /F /H".
- Then restart PC from USB drive and follow the instructions to clean install Windows 10 or 11.
Cannot Repair Windows with Command Prompt and Lost the File? Recover Now!
Have tried these command lines on your PC but found files are deleted or missing for unknown reasons, or just realized you’ve lost some important data after factory resetting or clean install? No panic, we have the most reliable choice for you, using Cisdem Data Recovery.
Yes, there are many data recover programs designed to recover data from a factory reset or crashed PC, but Cisdem is unrivaled in its high recovery rate and rich capabilities. It can restore files from both internal and external storage devices on a Windows PC, no matter the files how and when get lost. To repair Windows without losing data, Cisdem offers the most trustworthy solution to restore data after a factory reset, fresh start, clean install, system crash, drive formatting. The crashed PC recovery mode helps users regain access to data when their Windows PC won’t boot.
Main Features of Cisdem Data Recovery
- Restore files from Windows boot drive, external HDD, USB, SD Card and so on
- Recover files from NAS server
- Support crashed PC recovery
- Recover 1000+ files: video, audio, email, document, image, etc.
- Repair damaged videos and photos
- Recover unsaved Microsoft Office documents
- Preview files before saving recoverable items to local drive
- Quick filter and locate a file
- Recover files from specified folders
How to Restore Data from Windows 10 or 11 after Factory Reset, Clean Install, etc.
- Download and install Cisdem Data Recovery on your Windows 10 or 11.
 Free Download Windows 11/10/8/7
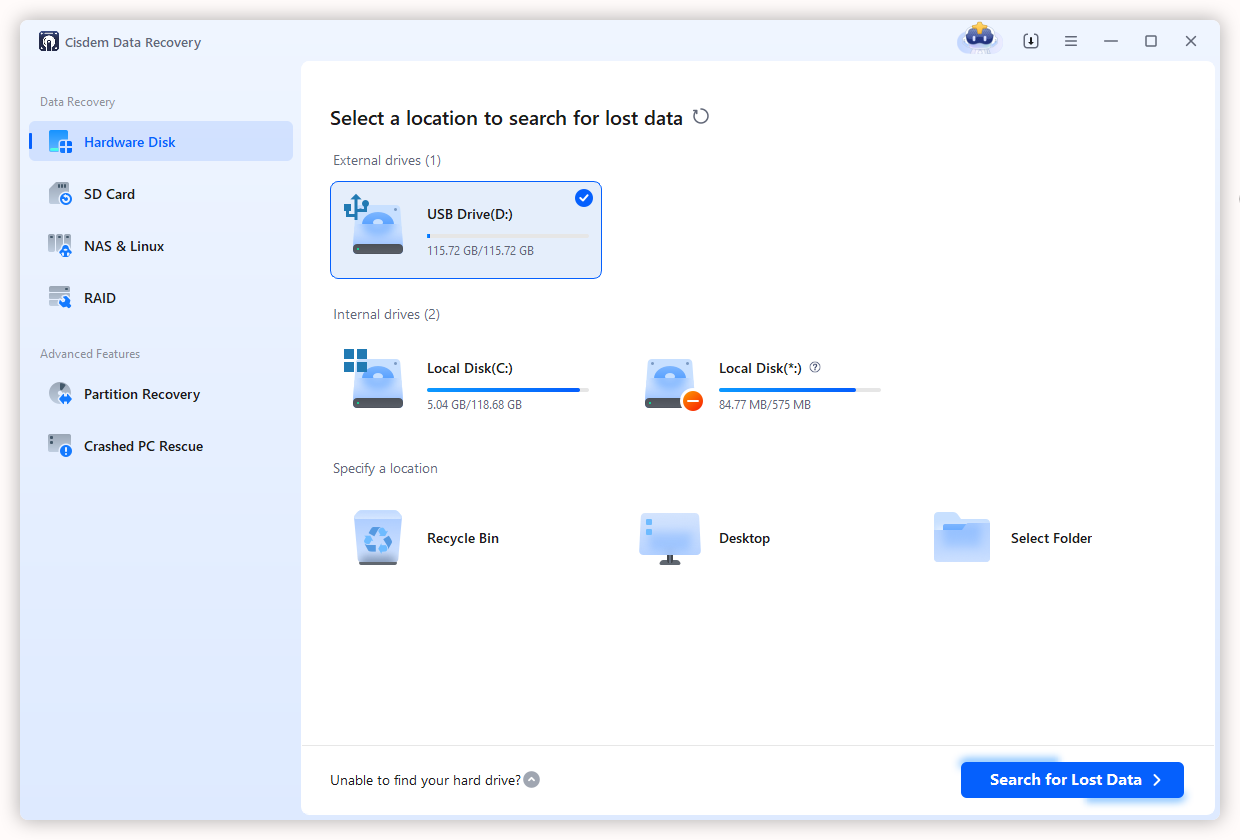
 - Select Hardware Disk. Choose a location where you lost the data and click Search for Lost Data.
![cisdem repair windows 01]()
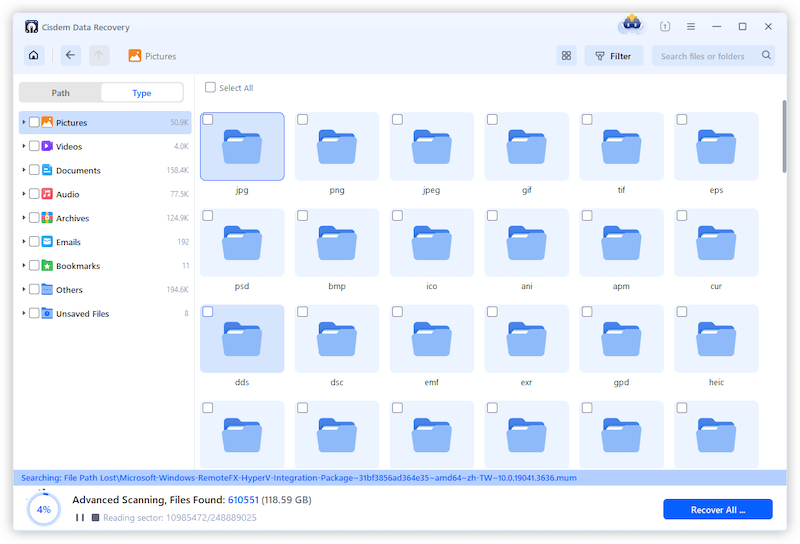
- Find and preview the recoverable files. Go to Type, find the files according to document type or extension. You can also use the filter tool to quickly locate a file.
![cisdem repair windows 02]()
- Select the files and click Recover.
![cisdem repair windows 03]()
How to Restore Data from Crashed Windows 10 or 11 That Won’t Boot?
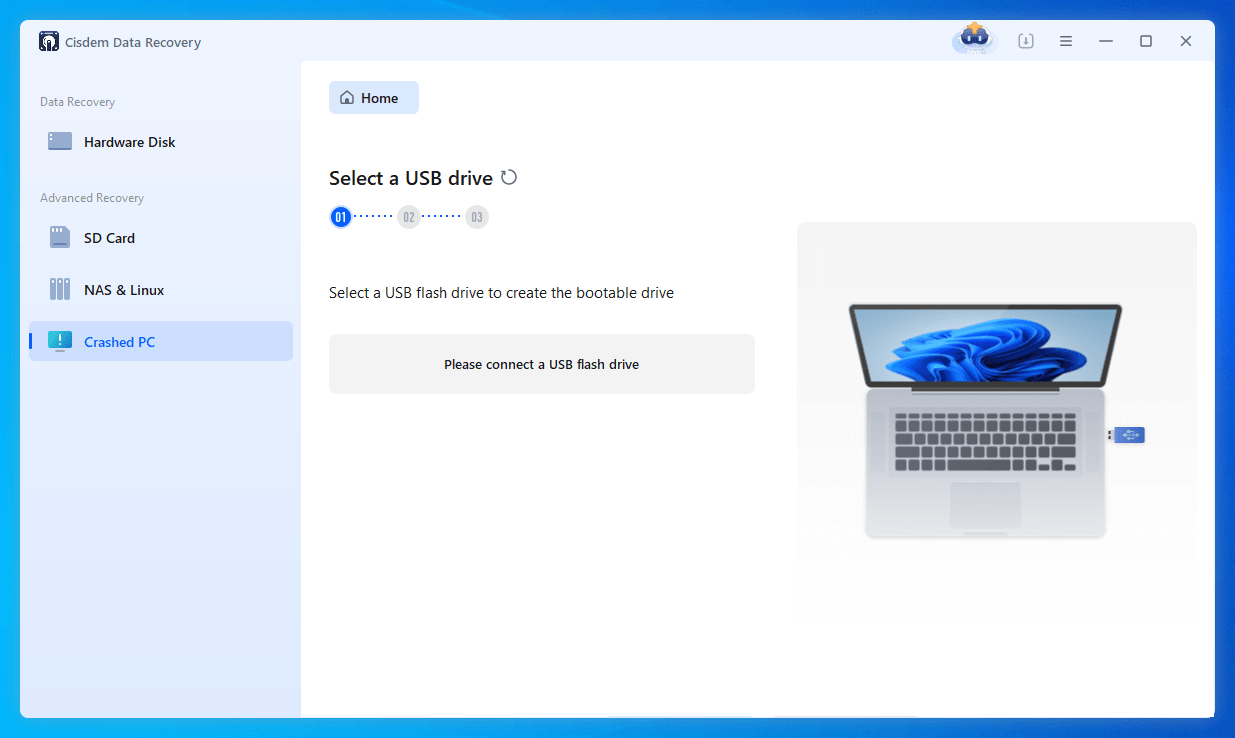
- Connect a USB drive to your Windows PC so you can use as bootable media.
- Download and install Cisdem Data Recovery on your Windows 10 or 11.
 Free Download Windows 11/10/8/7
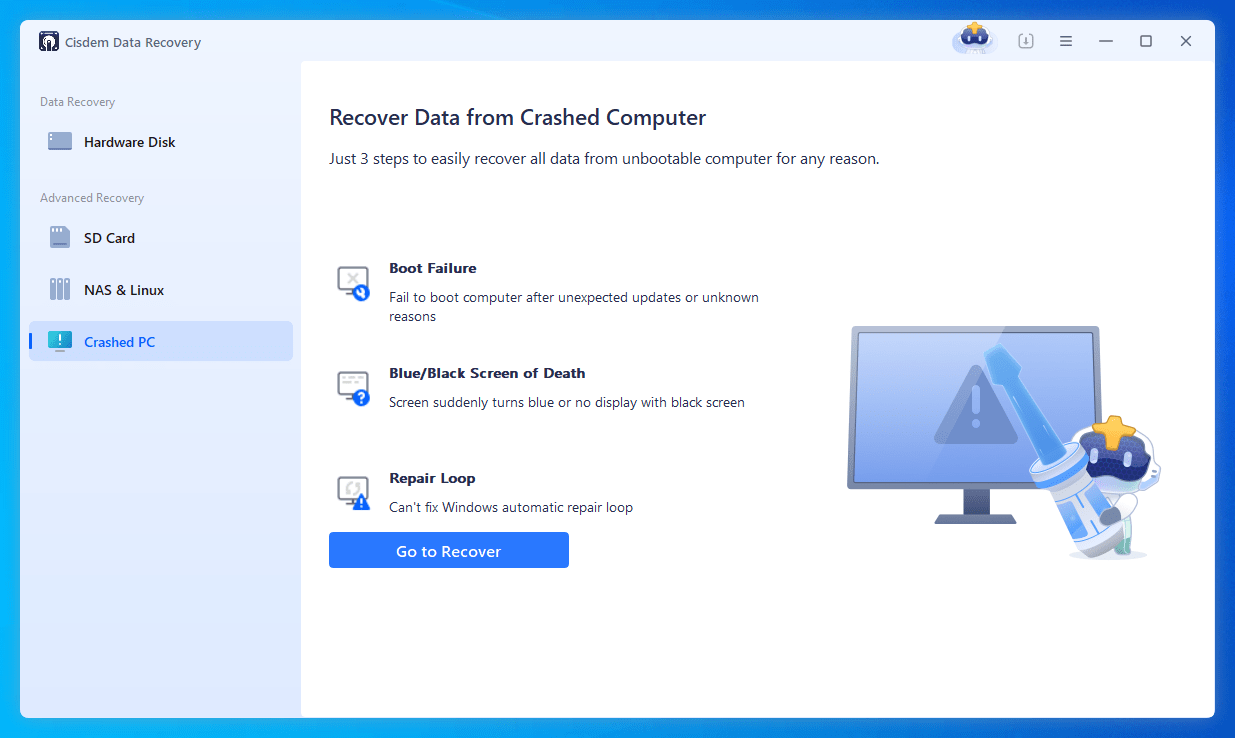
 - Go to Crashed PC Recovery and click Go to Recover.
![cisdem repair windows 04]()
- Follow the instructions to select and create a bootable drive.
![cisdem repair windows 05]()
- Select the drive where you lost the files, click Scan.
- Then go to Type, search or filter the files.
- Finally select the files you want to restore and click Recover.
Final Thoughts
According to users, sometimes they can repair their Windows 10 or 11 with sfc or dism command, but in most cases, they prefer to asking advice from an expert before factory resetting or reinstallation, and in the end, they are recommended to do so. By resetting or reinstalling, you will have the fear of losing files, but thanks to professional data recovery programs like Cisdem, we can still get our data back after trying different ways to repair our Windows and losing the files in the process.

Zoey shows a great interest in what she does. Although not long with Cisdem, she has possessed a professional understanding of data recovery.

JK Tam is the lead developer at Cisdem, bringing over two decades of hands-on experience in cross-platform software development to the editorial team. He is now the lead technical approver for all articles related to Data Recovery and DVD Burner.


